Help Center
Creating a tournament
Creating a tournament on Command Tower is a straightforward process designed to be quick and user-friendly. You'll start by entering a few basic details, which will allow you to access the rest of the tournament settings and customize the event to your liking.
Step 1: Go to the Dashboard
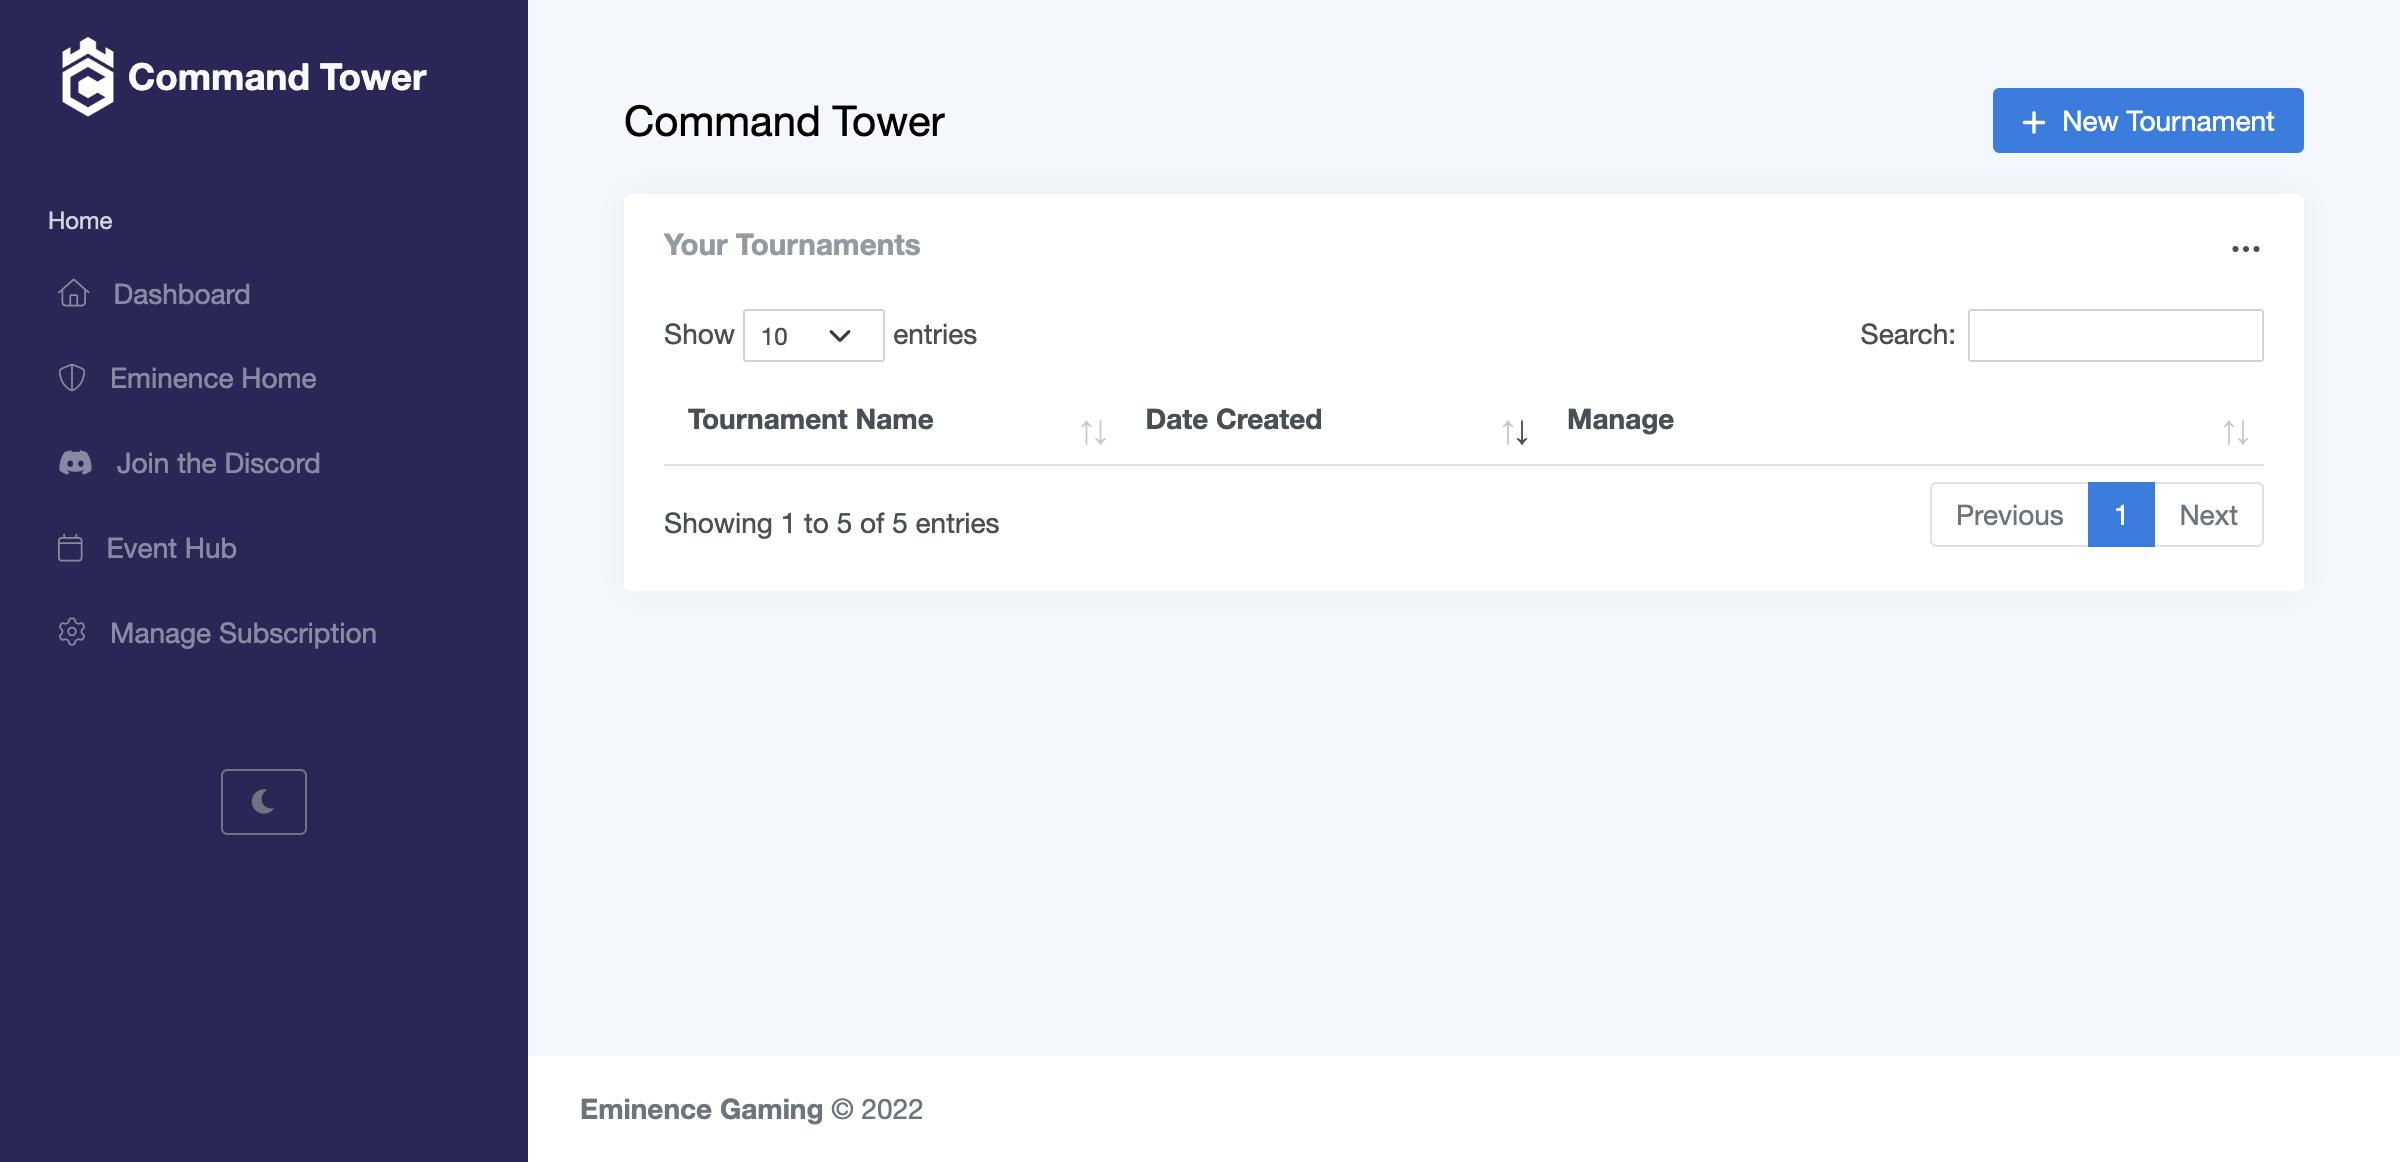
Log in to your Command Tower account and go to your dashboard. In the top right corner, click "New Tournament".
Step 2: Enter Tournament Details
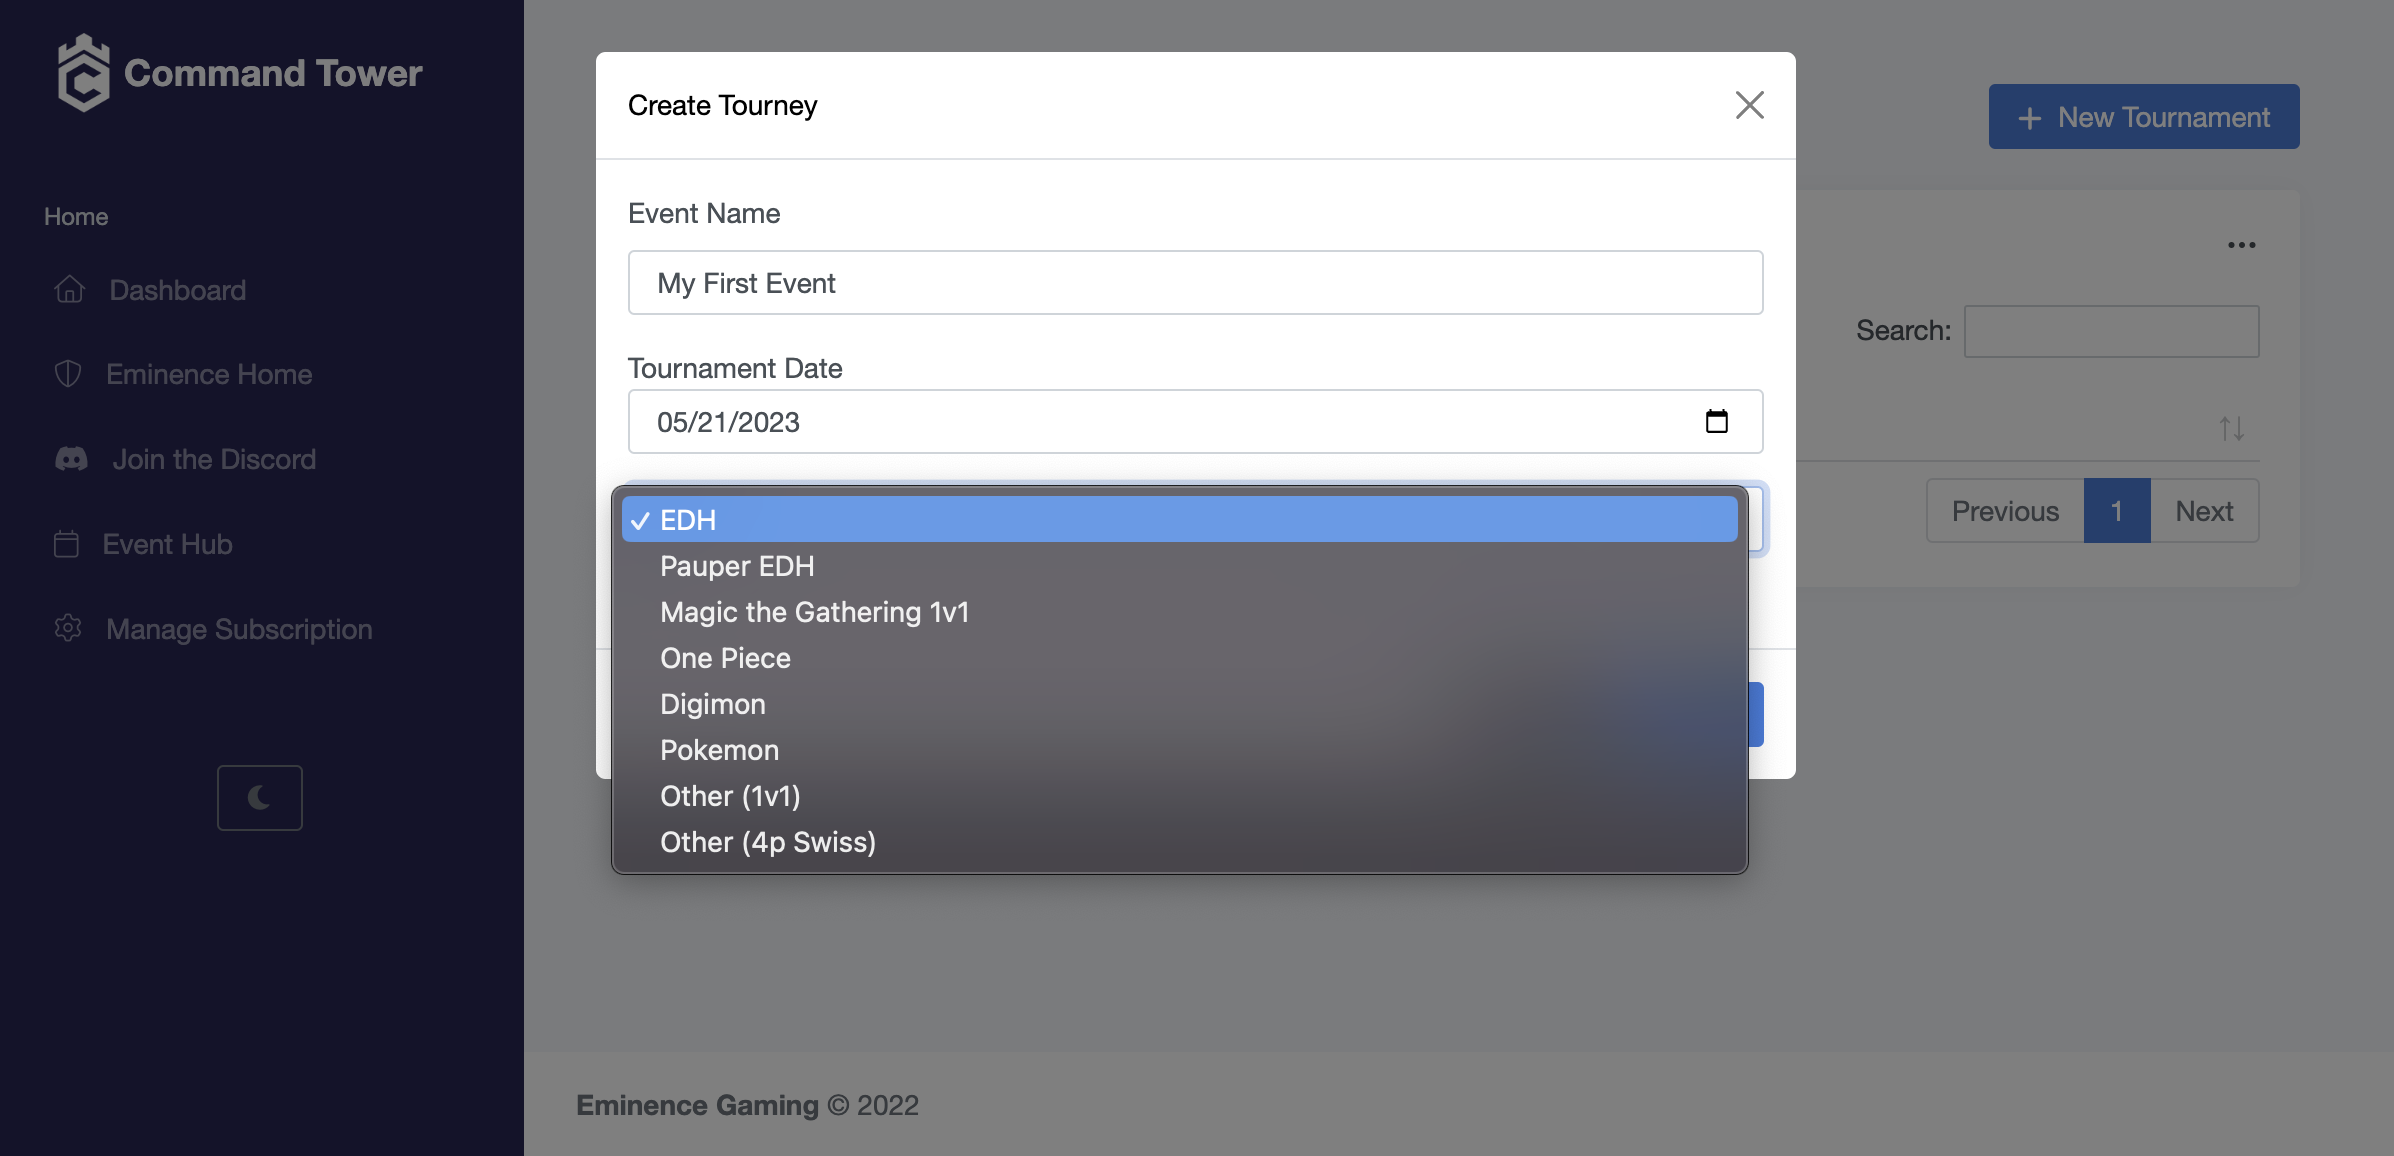
Enter a name for your tournament. Note that this name cannot be changed once the tournament has been created. Next, enter the date for your tournament.
Next, select the game for your tournament. The game you select will determine whether you use 4 player swiss or 1v1 format.
Step 3: Set up the Configuration
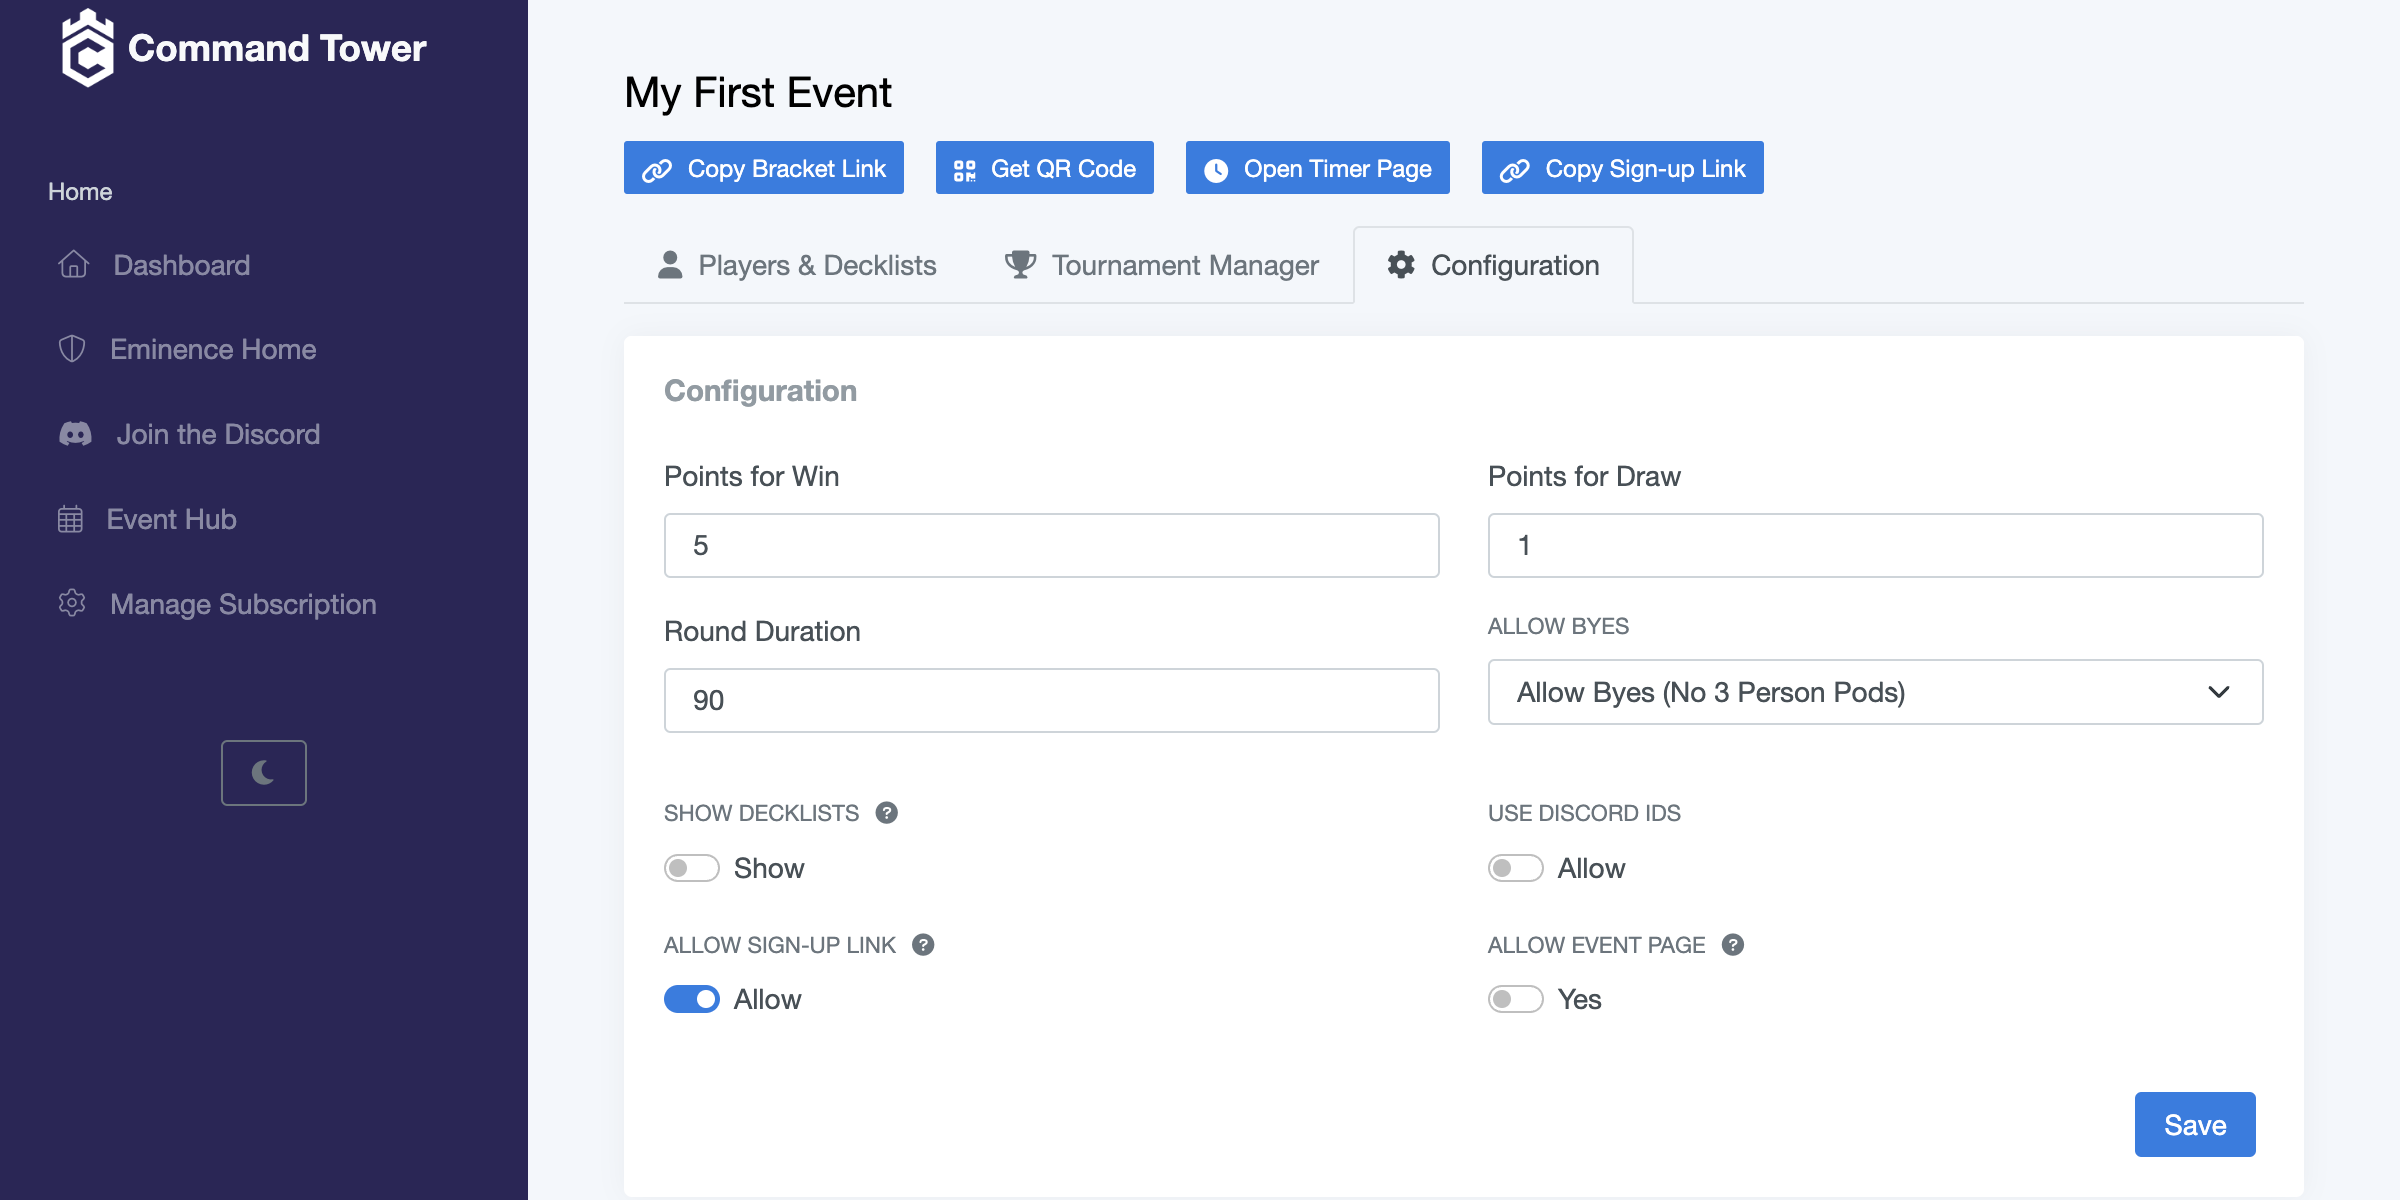
Click on the tournament you just created to set up the configuration. In the configuration page, set the number of points per win and draw. You can also set the duration for each round. If you are using 4 player swiss, you can also set up the type of byes to be used. Choose whether to show decklists or not. You can choose to show decklists publicly or only to tournament organizers, and you can change this setting at any time, even after the tournament has started.
Step 4: Create Sign-up or Event Pages (Optional)
Check the box to create a linkable sign-up page or event page. This will allow participants to register for the tournament.
A sign-up link is a simple link that you can give to participants, which they can use to sign up for the tournament. An event page, on the other hand, is a fully customizable page that you can create with details, images, and more. The event page can include information about the tournament, such as the date, time, location, rules, and prizes. Participants can sign up for the tournament directly on the event page. By checking the box to create a linkable sign-up page or event page, you can make it easy for participants to register for the tournament and attract more participants.
Step 5: Save Your Settings
Click "Save" to save your configuration settings. You can come back and change these later.
Congratulations! You have successfully created a tournament in Command Tower.
Creating a tournament is an important first step in running a successful event. With Command Tower, you can easily create and manage tournaments for a variety of game formats. By following the steps outlined in this article, you can quickly create a tournament and start inviting participants to join.
Creating event pages
An event page is a great way to promote your tournament and allow players to register online. With Command Tower, you can easily create a customized event page to showcase your tournament details, images, and more. Here's how to get started:
Step 1: Navigate to Event Pages
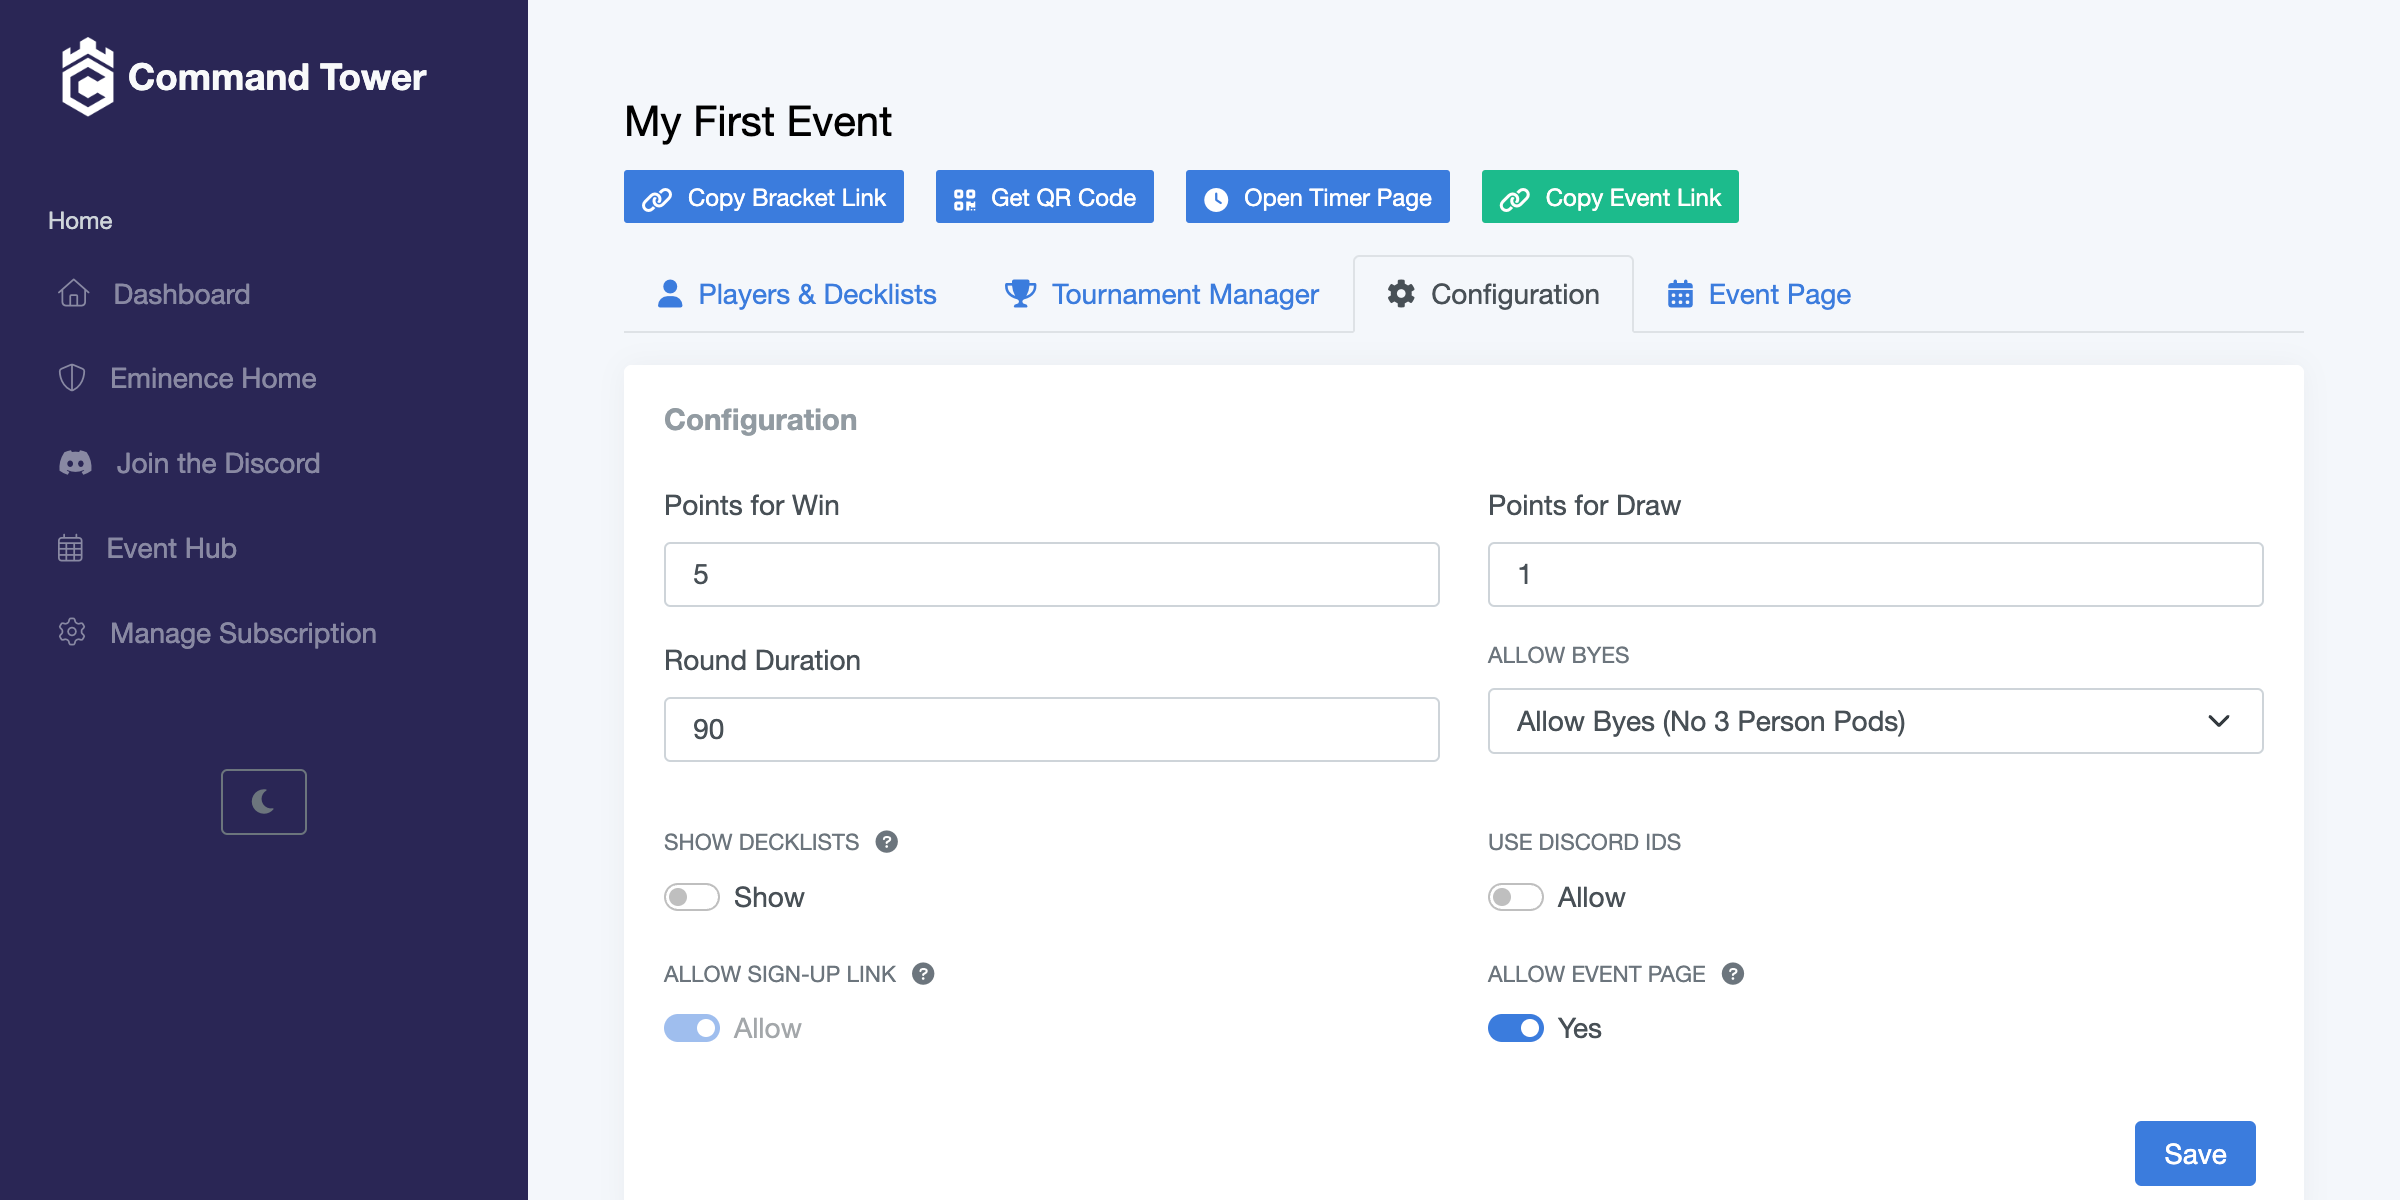
To create an event page for your tournament, you'll need to enable the "Allow Event Page" option in the Configuration menu. Don't forget to save your changes! Once enabled, an "Event Page" tab will appear at the top of your screen, allowing you to access and edit your page settings.
Step 2: Fill out Mandatory Settings
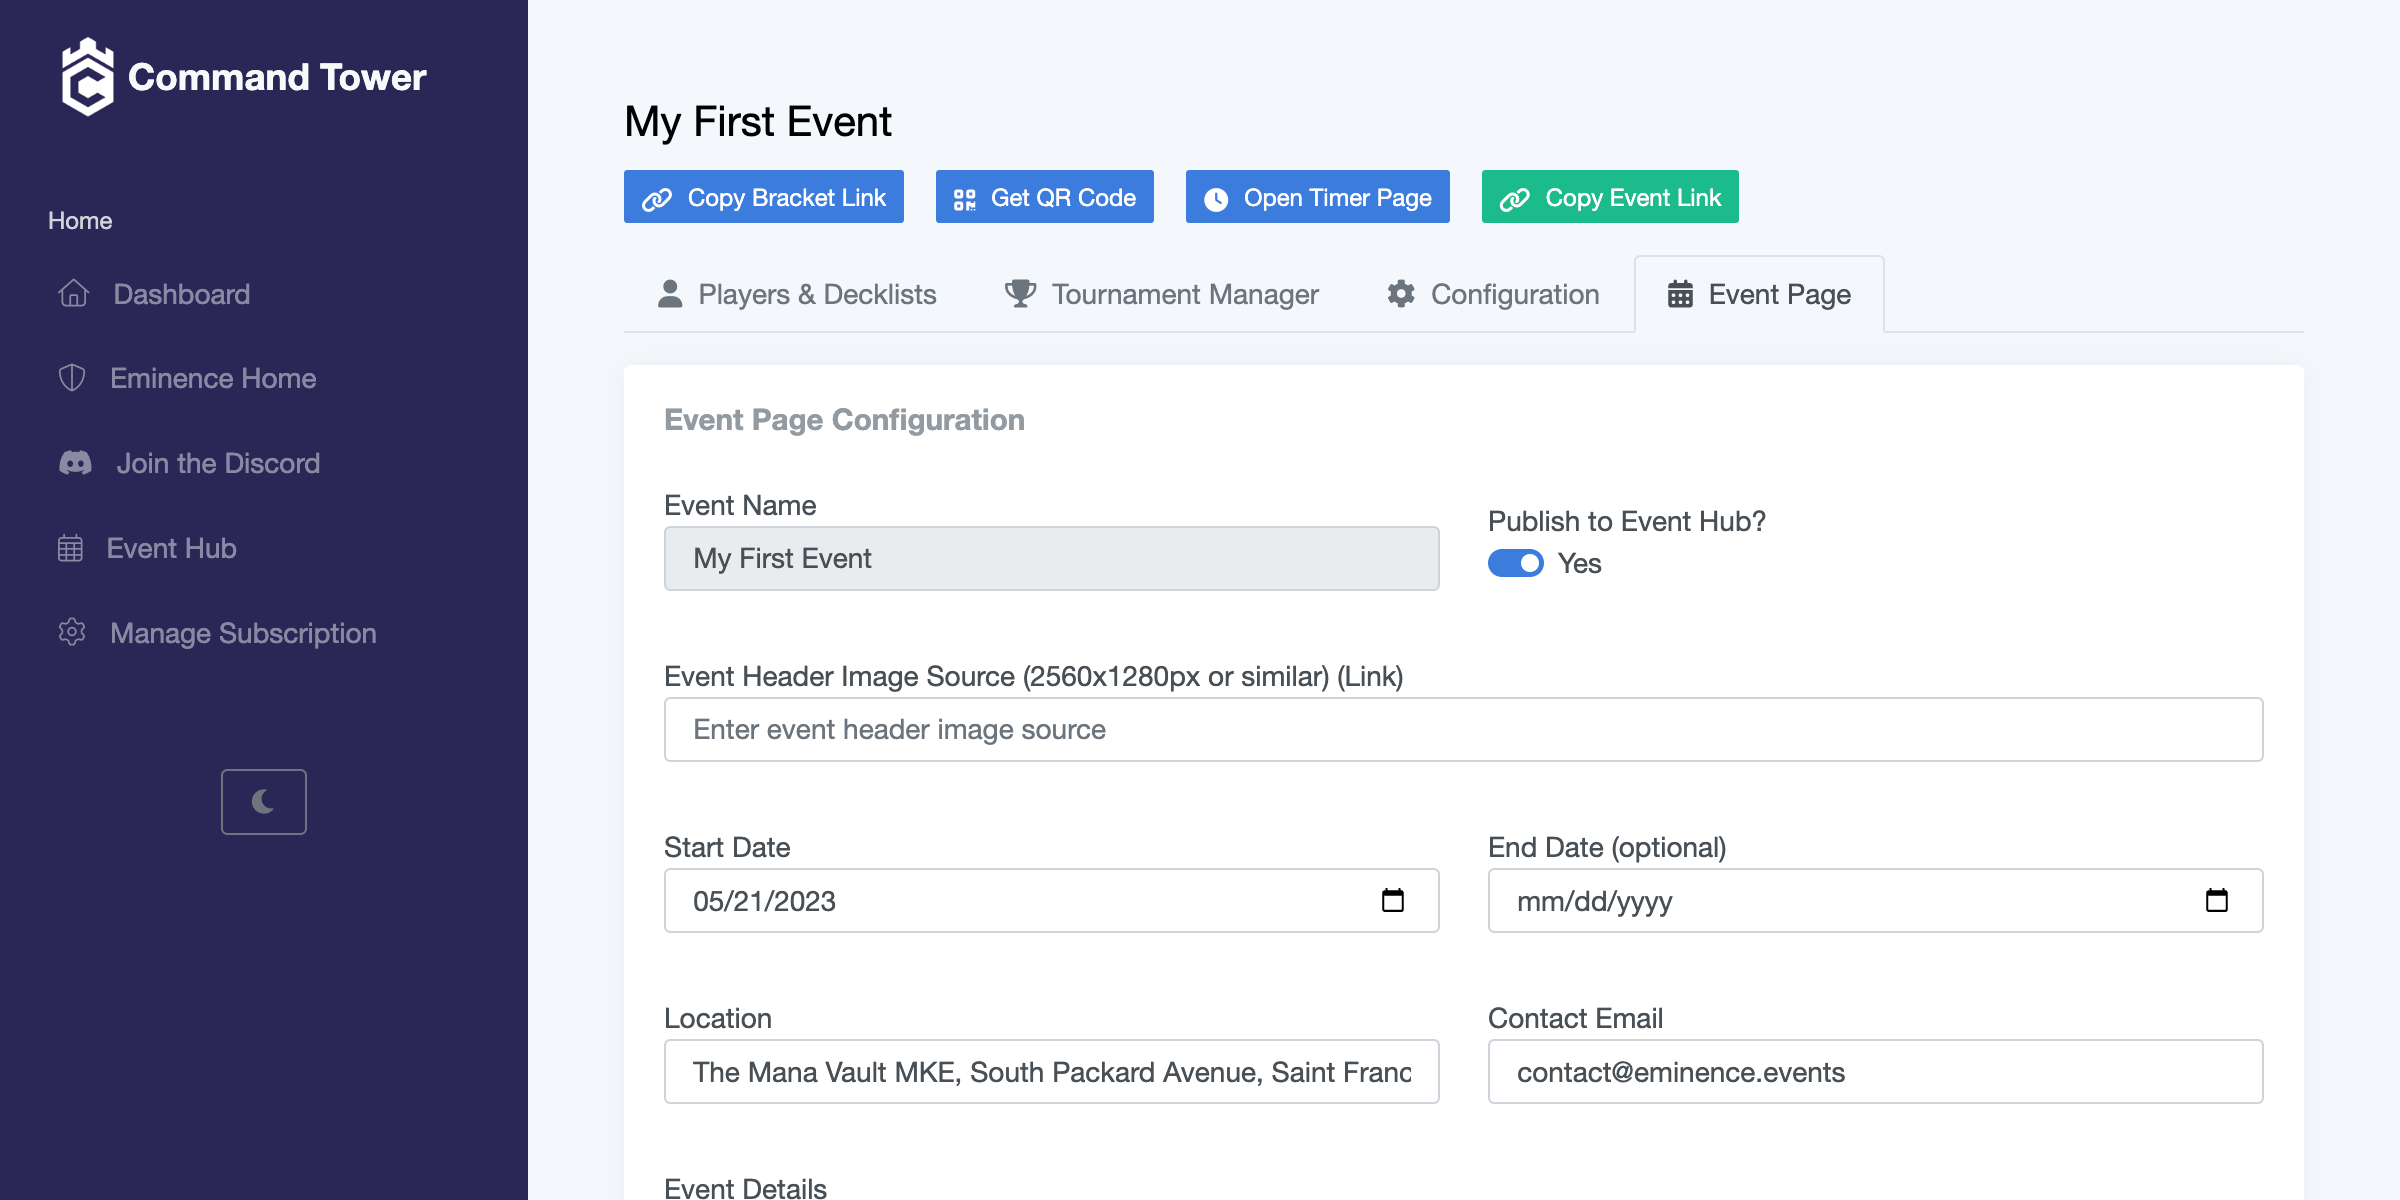
The mandatory settings include the "Start Date", "Location", "Contact Email", and "Event Details" for your event. You can use Markdown to format the event details section, allowing you to add headings, lists, images, and other formatting to the text. To learn more about Markdown, click here
Step 3: Add Optional Settings
There are several optional settings that you can use to customize your event page further:
Publish to Event Hub
You can publish your event to TopDeck.gg, which is a directory of TCG events around the world. This can help attract more players to your event and make it more visible to the community.
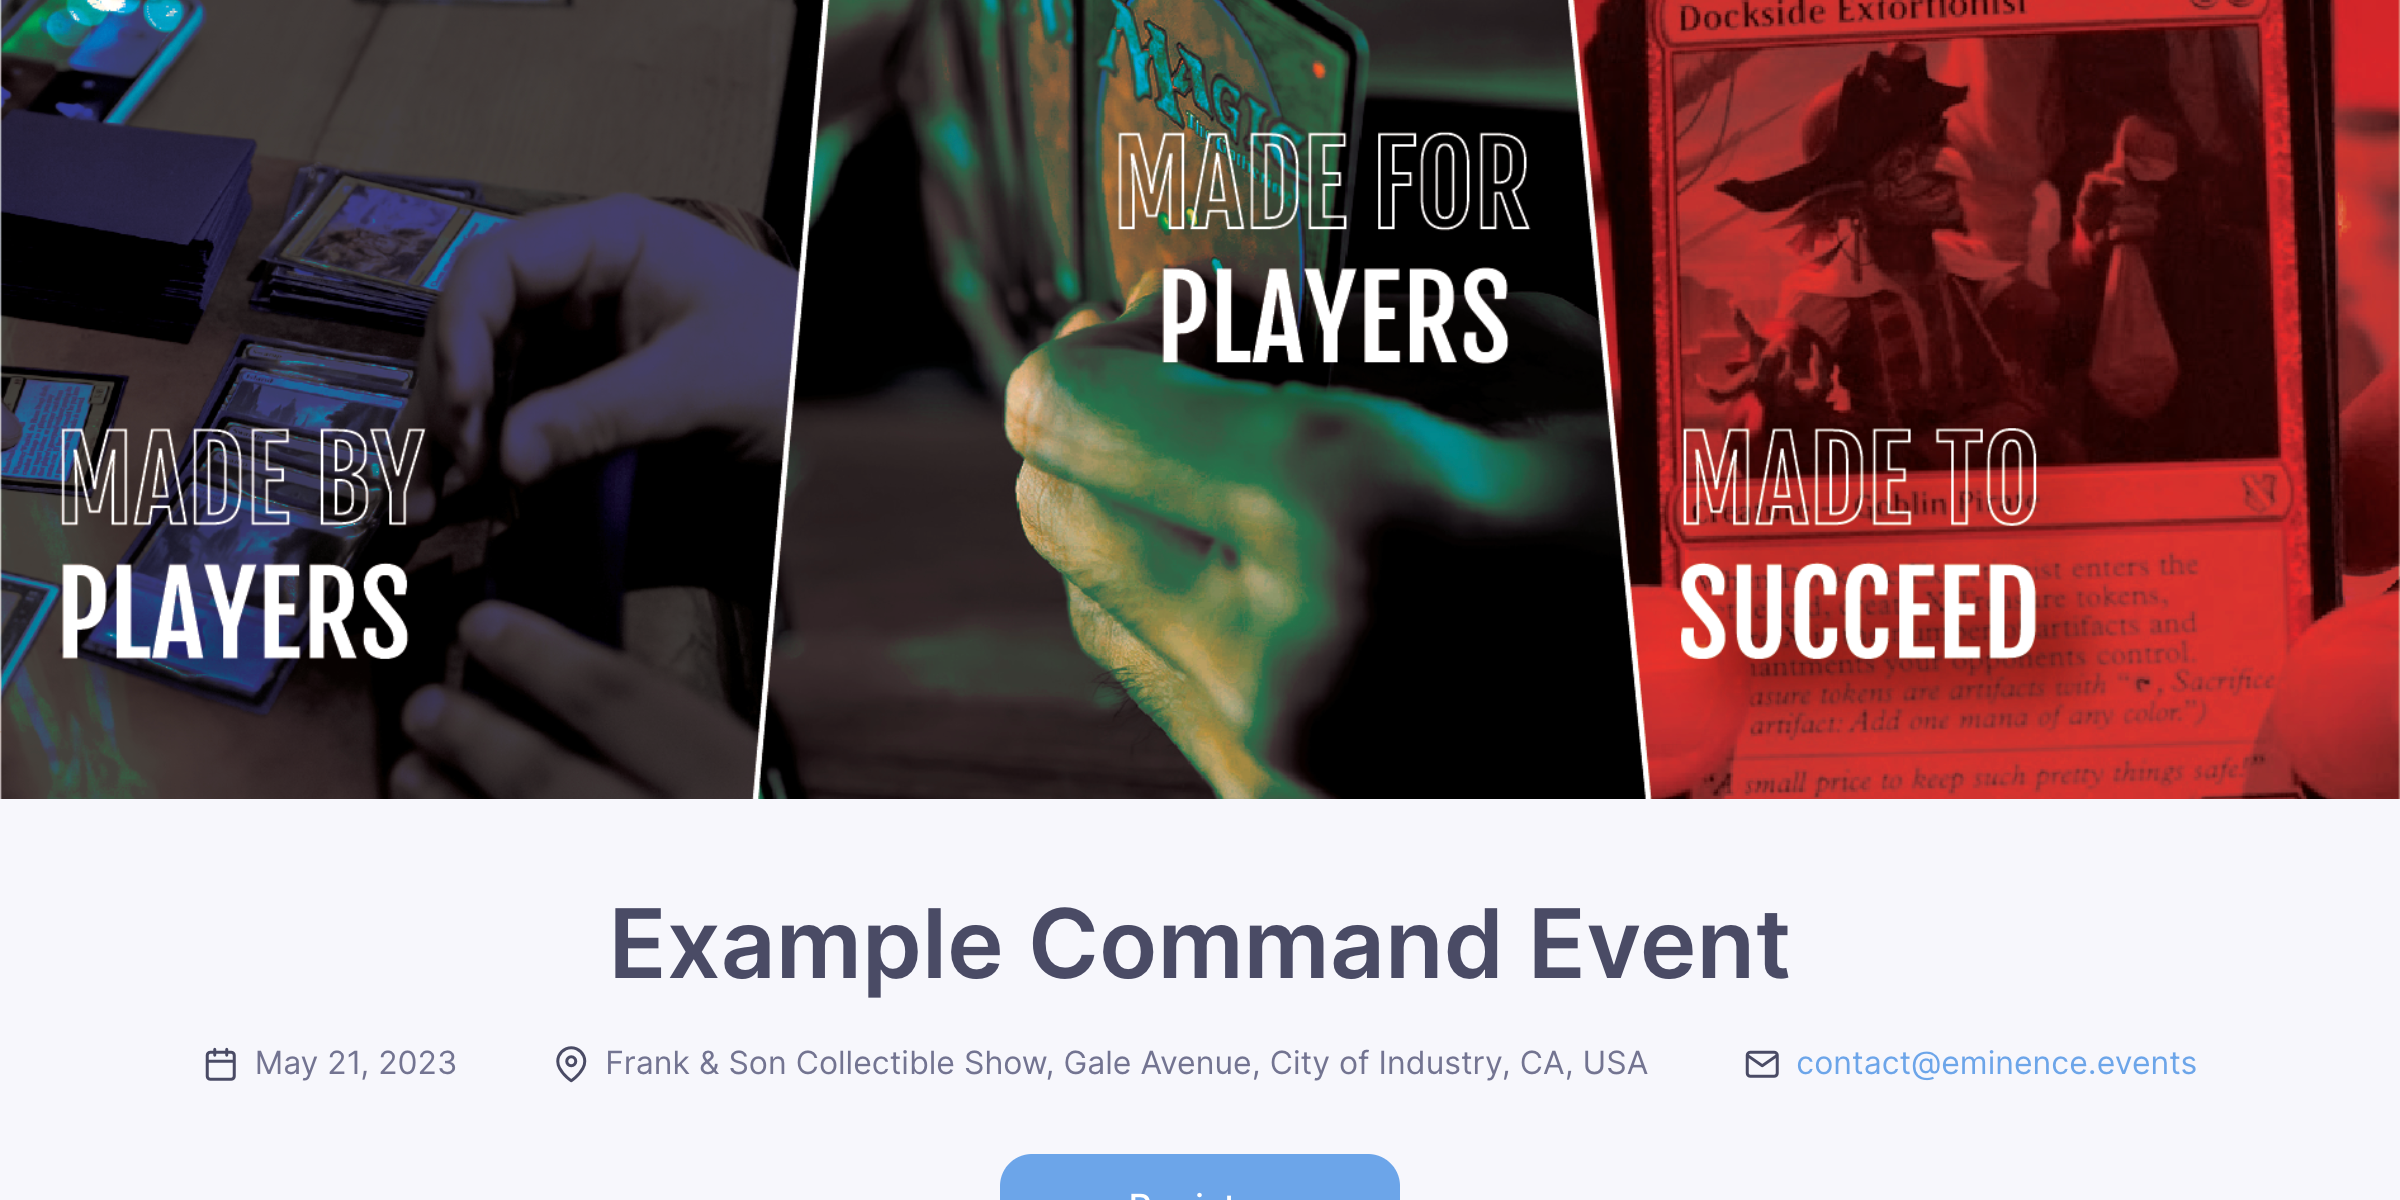
Event Header
You can add an event header to your page, which is a large image that appears at the top of the page. The recommended size for the event header is 2560x1280 pixels, or 2:1 aspect ratio. This image is used at the top of the event page, and on TopDeck.gg if you choose to publish there.
To add images to your tournament page, you'll need to upload them to an external site, such as ImageBB. Once you've uploaded your image, be sure to right-click on it and select "Copy Image Address." Make sure that the link ends in ".png" or a similar image file format. We recommend avoiding links from Facebook or Google Drive, as these links may expire after a period of time.
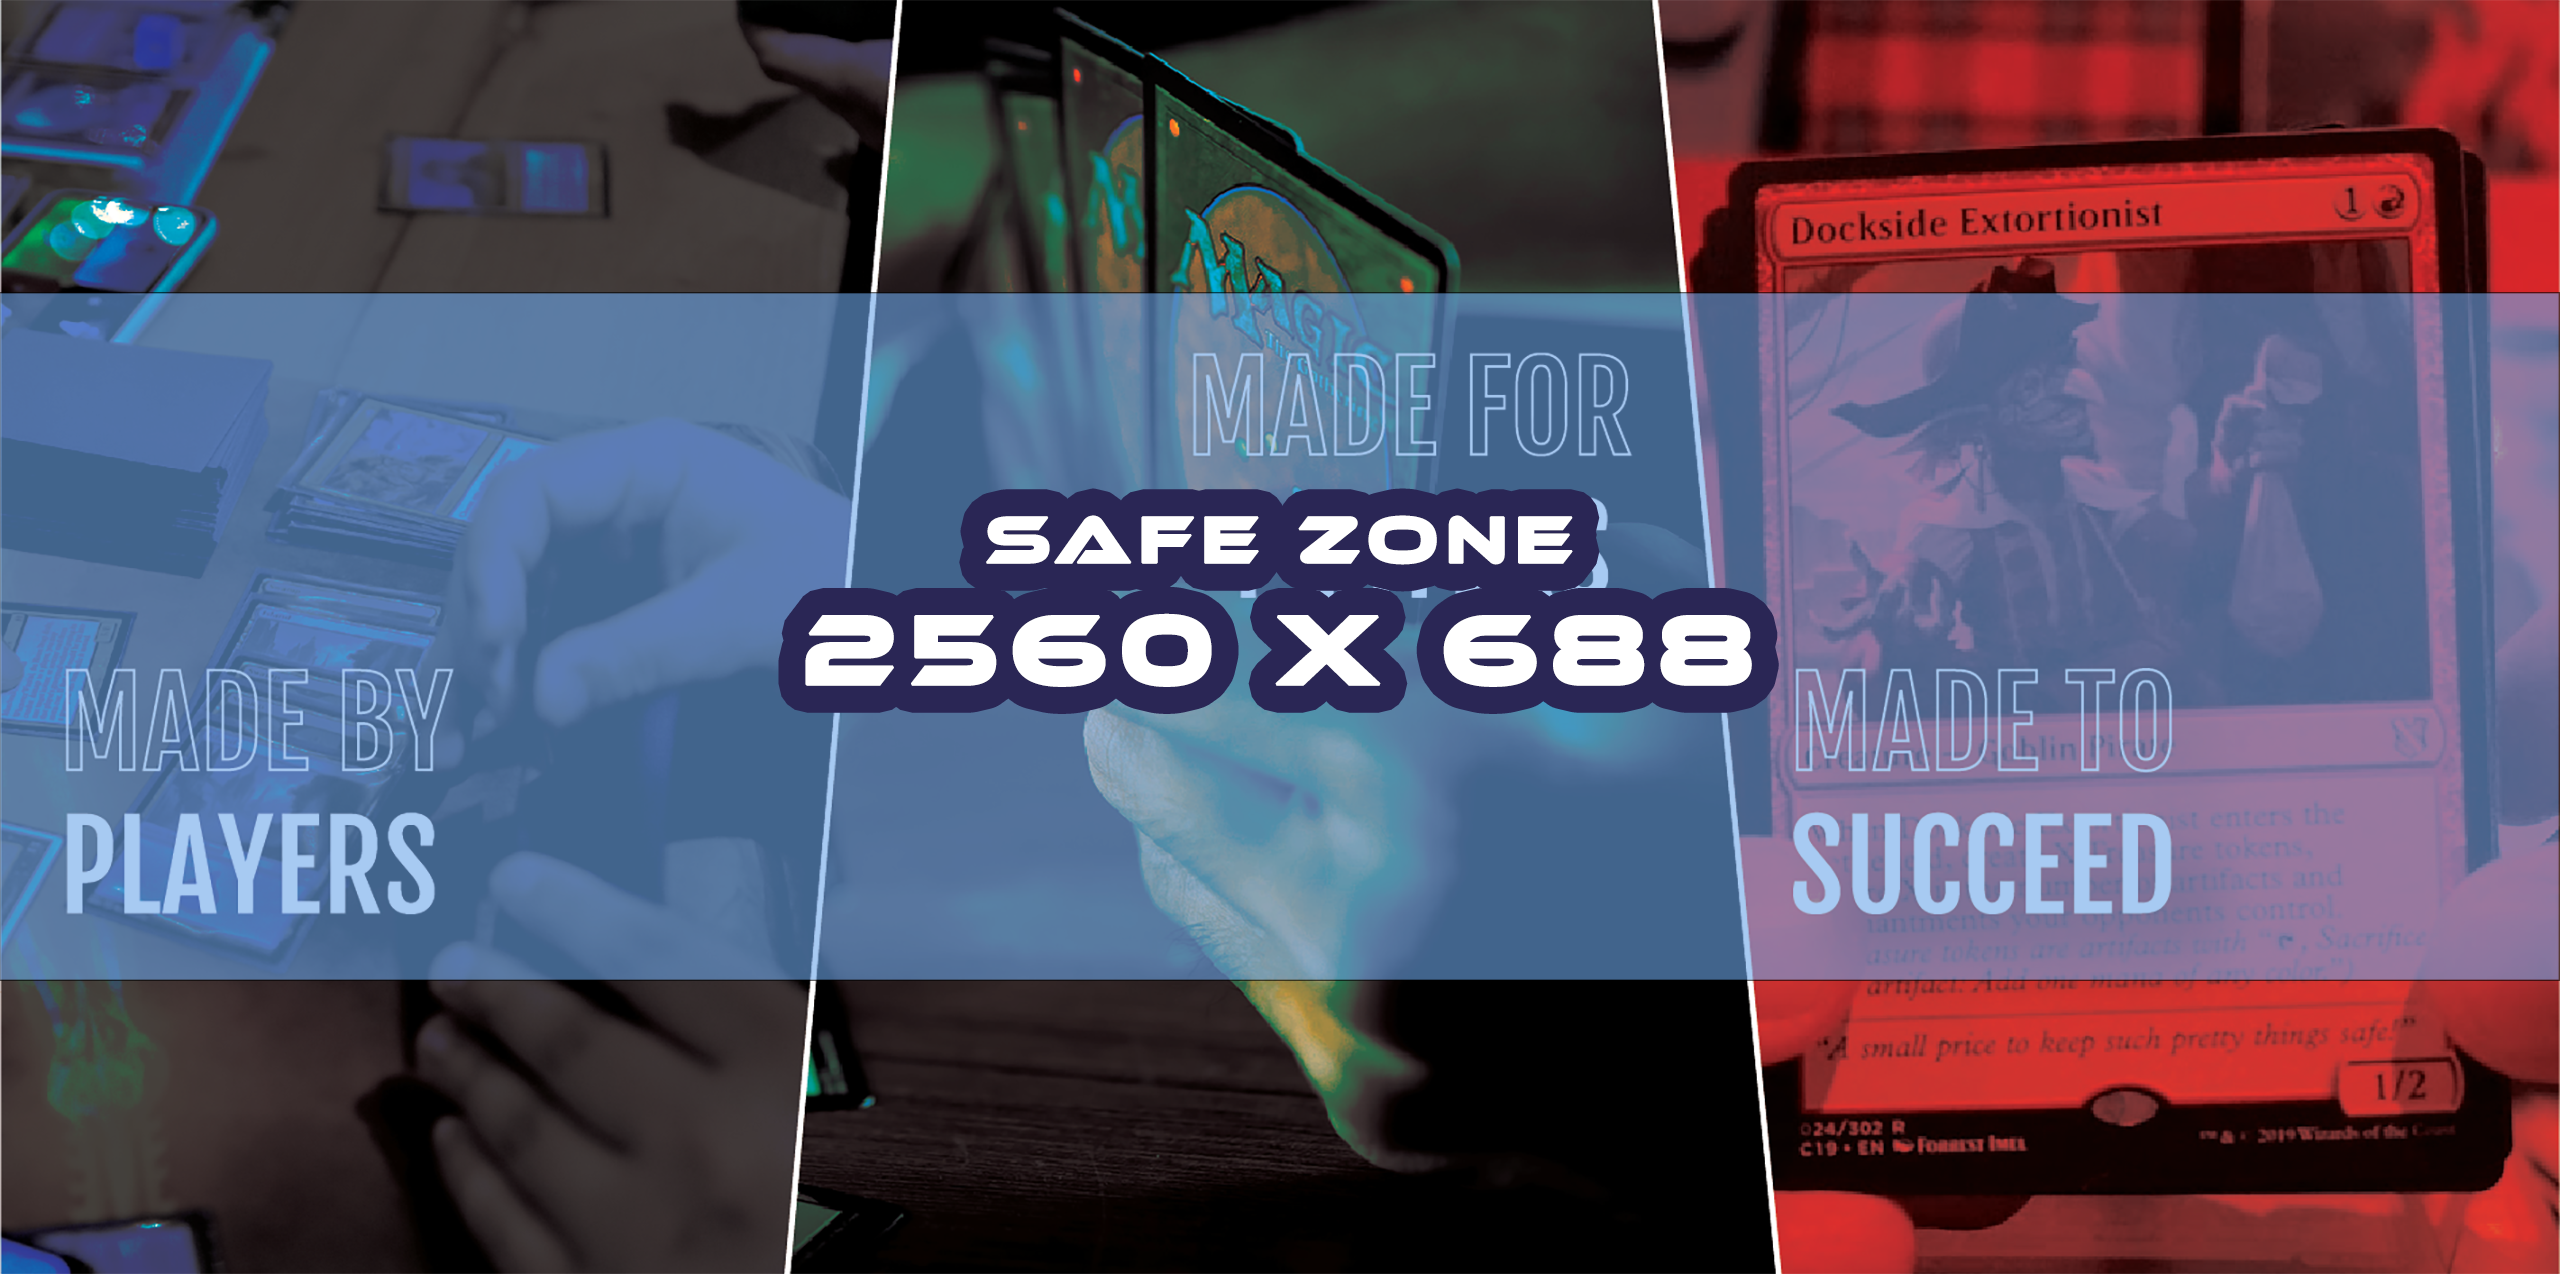
Note that there is a safe zone within the image, which is the area where text and other important elements should be placed to avoid being cut off on smaller screens. Included below are two examples of the safe zone. It’s best to put all important details within this zone, such as tournament name, dates, location, logos.
In the first image below, the safe zone is depicted in blue for screen sizes 1920x1080 (common for desktop displays)
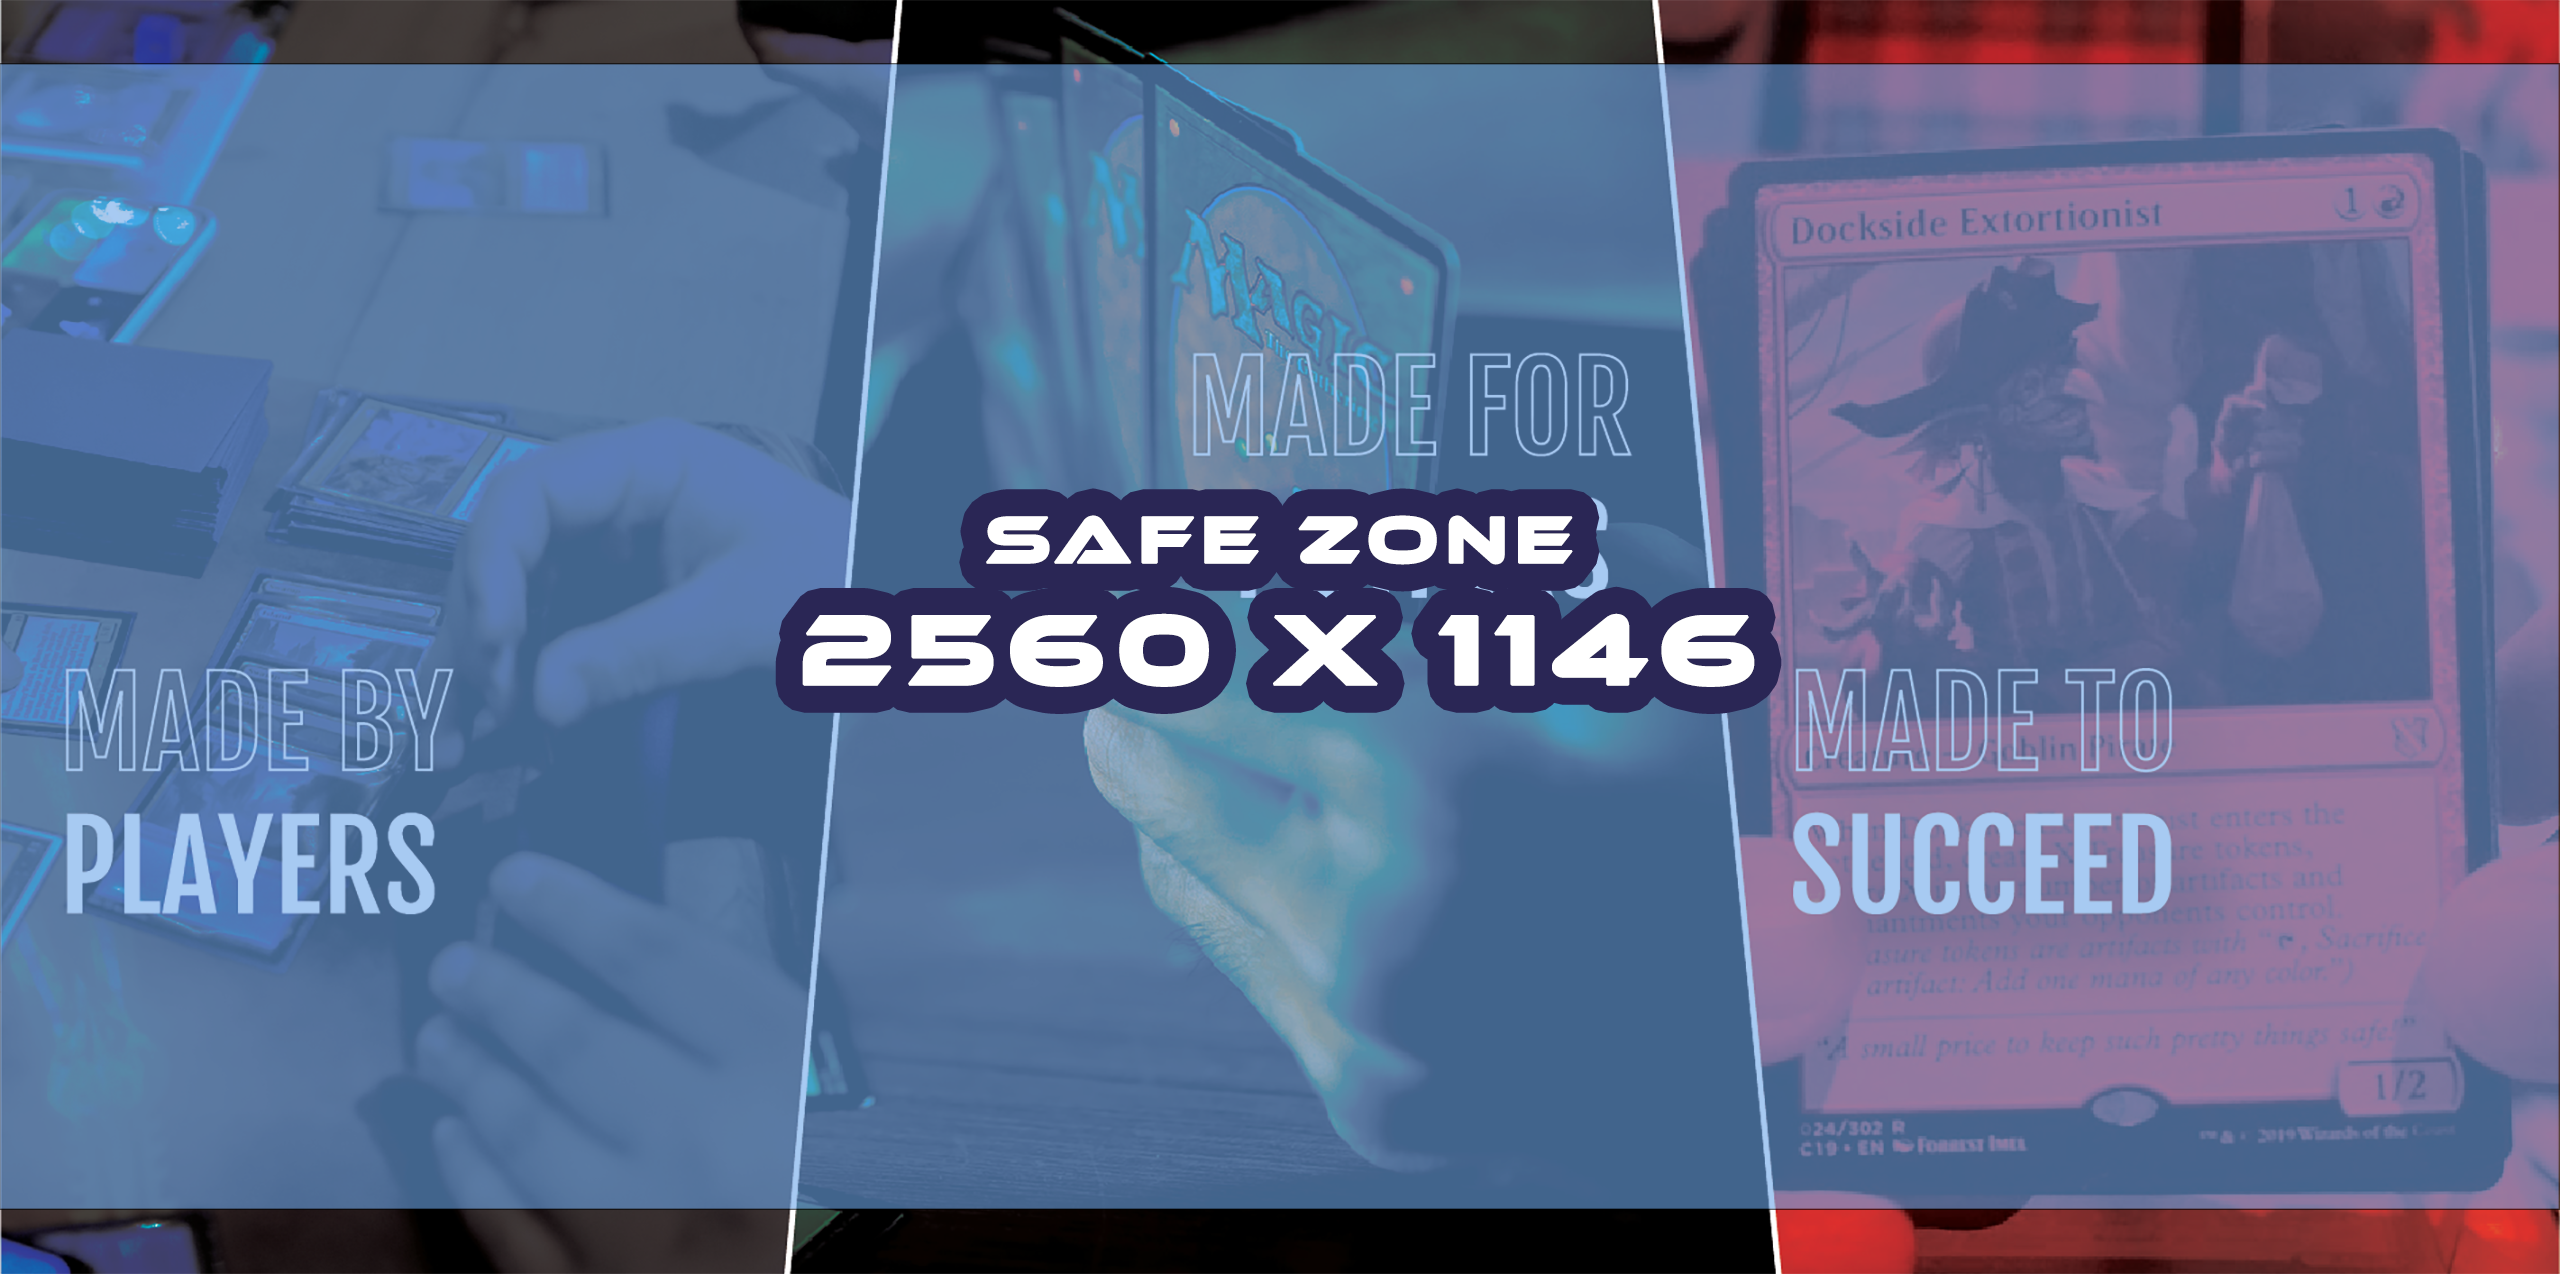
In the second image below, the safe zone is depicted in blue for screen sizes 720x1280, which is for mobile. On smaller mobile screens the entire image will appear.
Schedule
You can add a schedule to your page, which displays the date, time, and format of each round of the tournament. This can be useful for players to plan their day and see when they will be playing. This section also uses Markdown.
Payment Processing
To learn more about payment processing, please read the associated help article for it.
Event Player Cap
You can set a player cap for your event, which limits the number of players that can register. This can be useful if you have limited space or resources.
Allow Registration
You can choose to allow or disallow registration through the event page. If you turn off registration, the page will become an informational page only.
Social Links
You can add social links to your page, which appear in the footer of the page. This can be a great way to promote your social media channels and engage with your audience.
Step 4: Publishing Your Event
Once you have filled out all the necessary fields, be sure to click the "Save" button. You can find the link to your event by clicking the green "Copy Event Link" button!
Congratulations! You have successfully created an event page in Command Tower. Creating an event page is an important step in promoting and managing your tournament. With Command Tower, you can easily create a customized event page and attract more participants to your event. By following the steps outlined in this article, you can quickly create an event page and start promoting your tournament.
Getting Started with Payment Processing
Accepting payments through your event pages is a key feature of Command Tower, made possible by integrating Stripe Connect. This guide will walk you through the process of enabling payment processing, managing payments, issuing refunds, and understanding the associated fees. Here's a step-by-step guide:
Step 1: Start the Setup

Begin by clicking the payment processing setup link on the left sidebar. You'll need to fill out the necessary information for Stripe onboarding.
Step 2: Completion of Stripe Connect Onboarding
After completing the Stripe onboarding process, your account will be enabled with Stripe Connect, ready for payment processing. To learn more about Stripe Connect, click here.
Step 3: Enable Payment Processing for Events
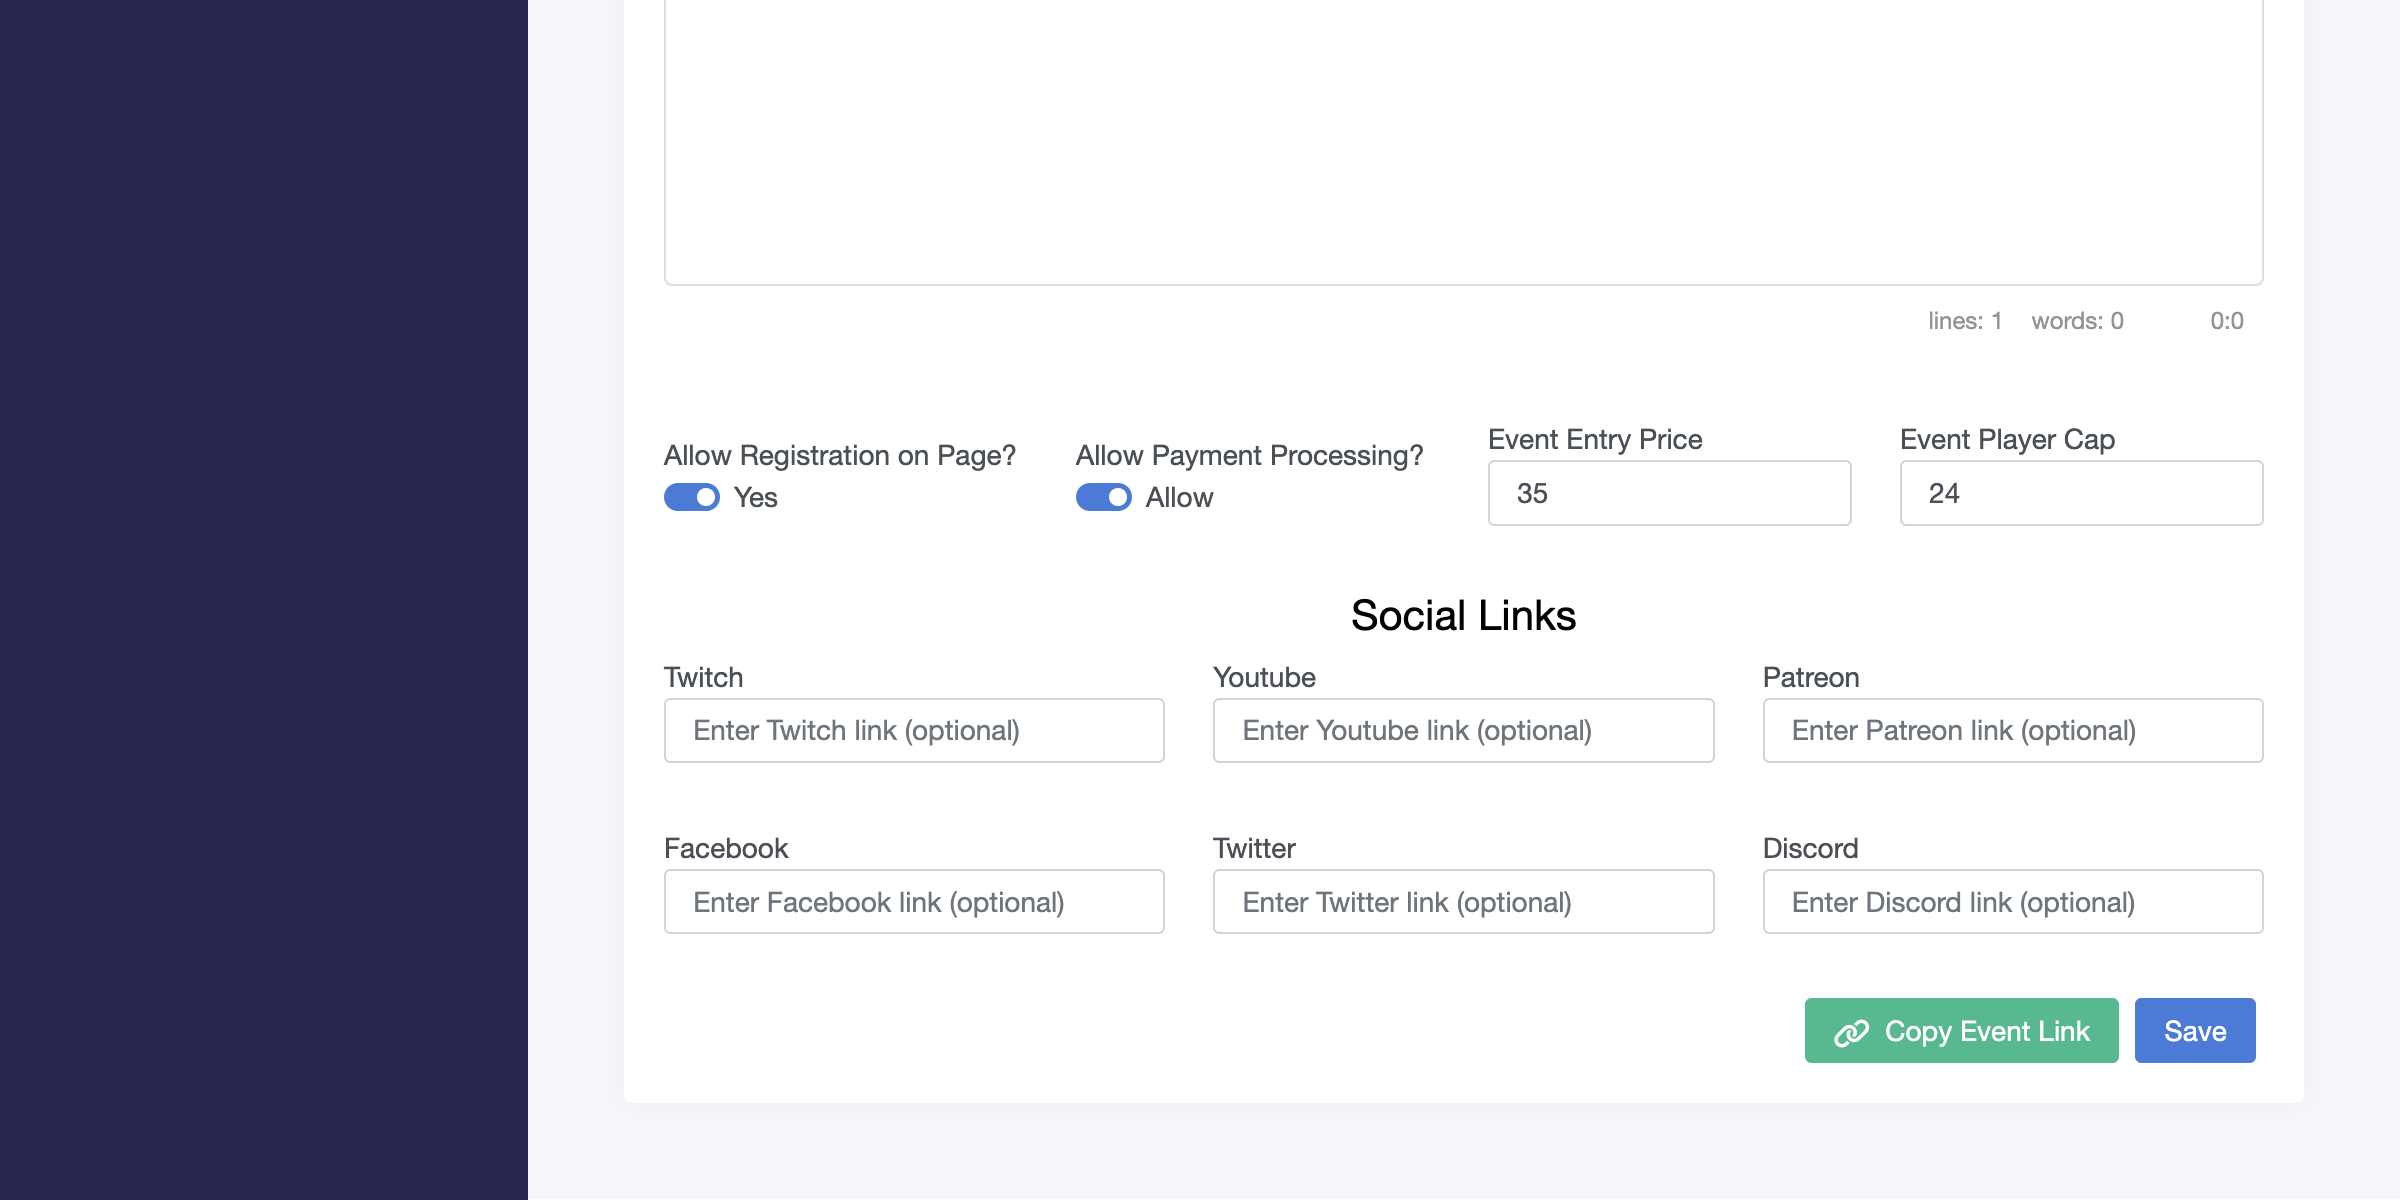
When creating or editing your event page, activate the Allow Payment Processing switch and input the event entry price. This will allow payments to be processed via Stripe directly on your event page.
Updating Ticket Price
To update the ticket price, change the Event price in the event page editor and save the changes. The event price will be updated automatically.
Initiate Refunds
To refund customers, visit the Stripe dashboard and navigate to the payments tab. Identify the appropriate payment/customer and issue the refund by clicking 'Refund'. Stripe fees are not refundable.
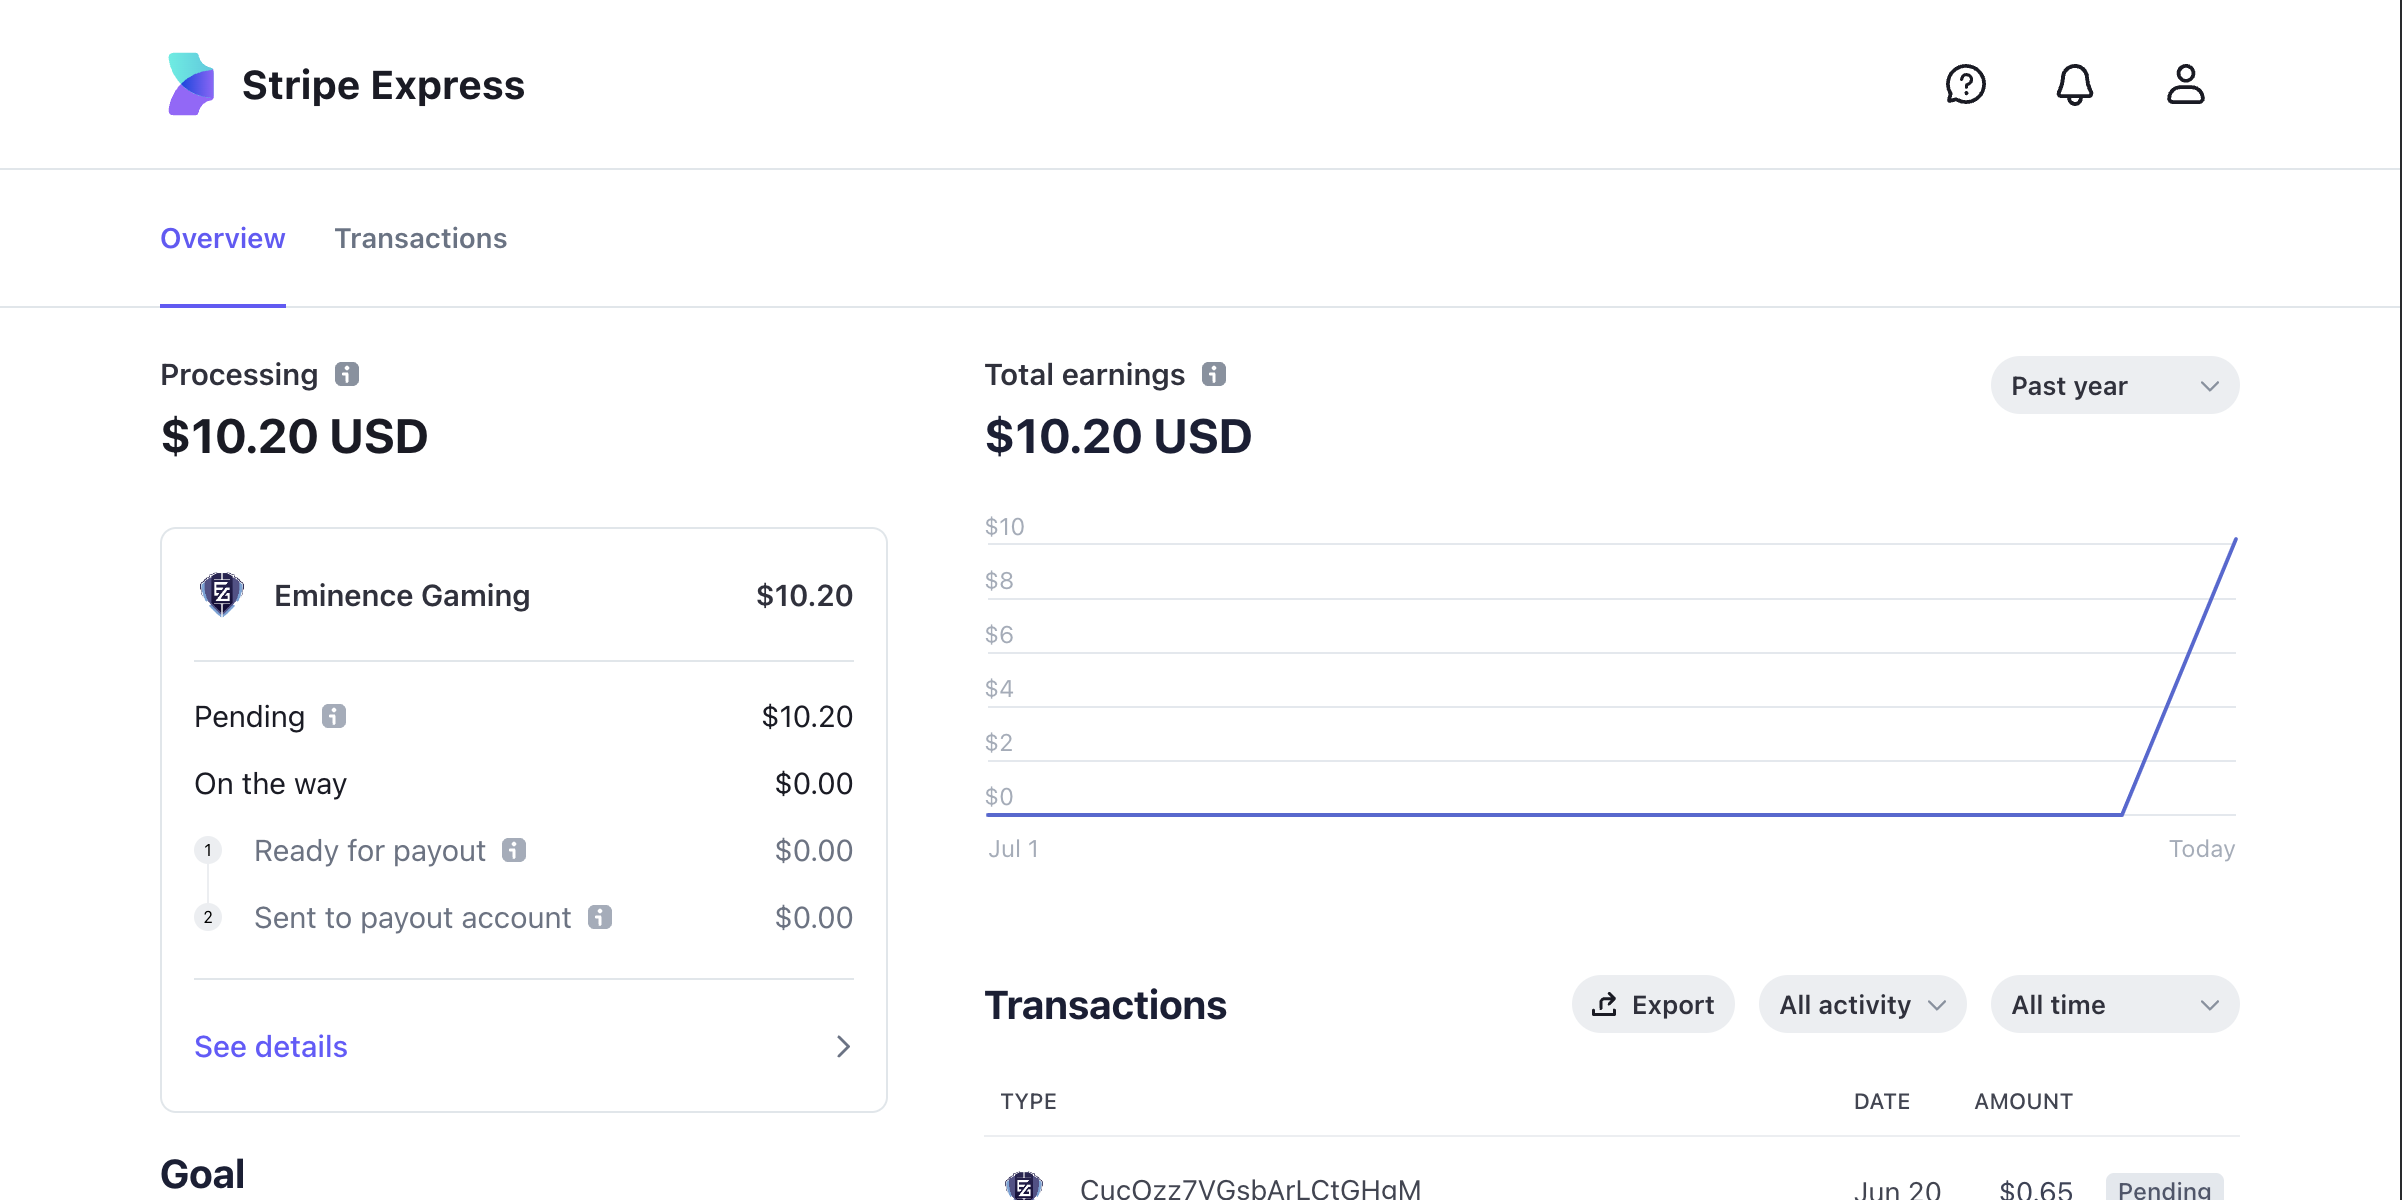
Understand Payouts
Payouts are processed on a two day rolling basis.
Disable Payments for an Event
To disable payments for an event, toggle the Payment Processing switch to off and save the changes on the event page editor.
Accessing Stripe
To access your Stripe dashboard, simply click here or the link on the sidebar.
Comprehend Fees
Familiarize yourself with Stripe's processing fees. Stripe's processing fees are usually 2.9% + 30¢. Command Tower imposes a 2% platform fee on each transaction, in addition to Stripe's fees. This means the total fees are usually 4.9% + 30¢ per transaction.
| Ticket Price | Stripe Fee | Command Tower Fee | Total Fees |
|---|---|---|---|
| $10 | $0.59 | $0.20 | $0.79 |
| $20 | $0.88 | $0.40 | $1.28 |
| $35 | $1.32 | $0.70 | $2.02 |
| $50 | $1.75 | $1.00 | $2.75 |
| $70 | $2.33 | $1.40 | $3.73 |
Congratulations! You have now set up payment processing for your event with Command Tower. The steps outlined in this article should enable you to navigate through the process with ease. Remember, efficient payment processing not only simplifies your management tasks but also enhances the user experience.
Managing Players in Command Tower
Managing players is an important aspect of running a successful tournament. With Command Tower, you can easily manage your players, mark them as paid, add or modify decklists, lock decklists, and delete players. Here's how to get started:
Automatically Signed Up Players

Players who register via sign-up link or an event page are automatically added to the player list and tagged with "Sign-up". This allows you to quickly see who has registered for your tournament.
Adding Players Manually
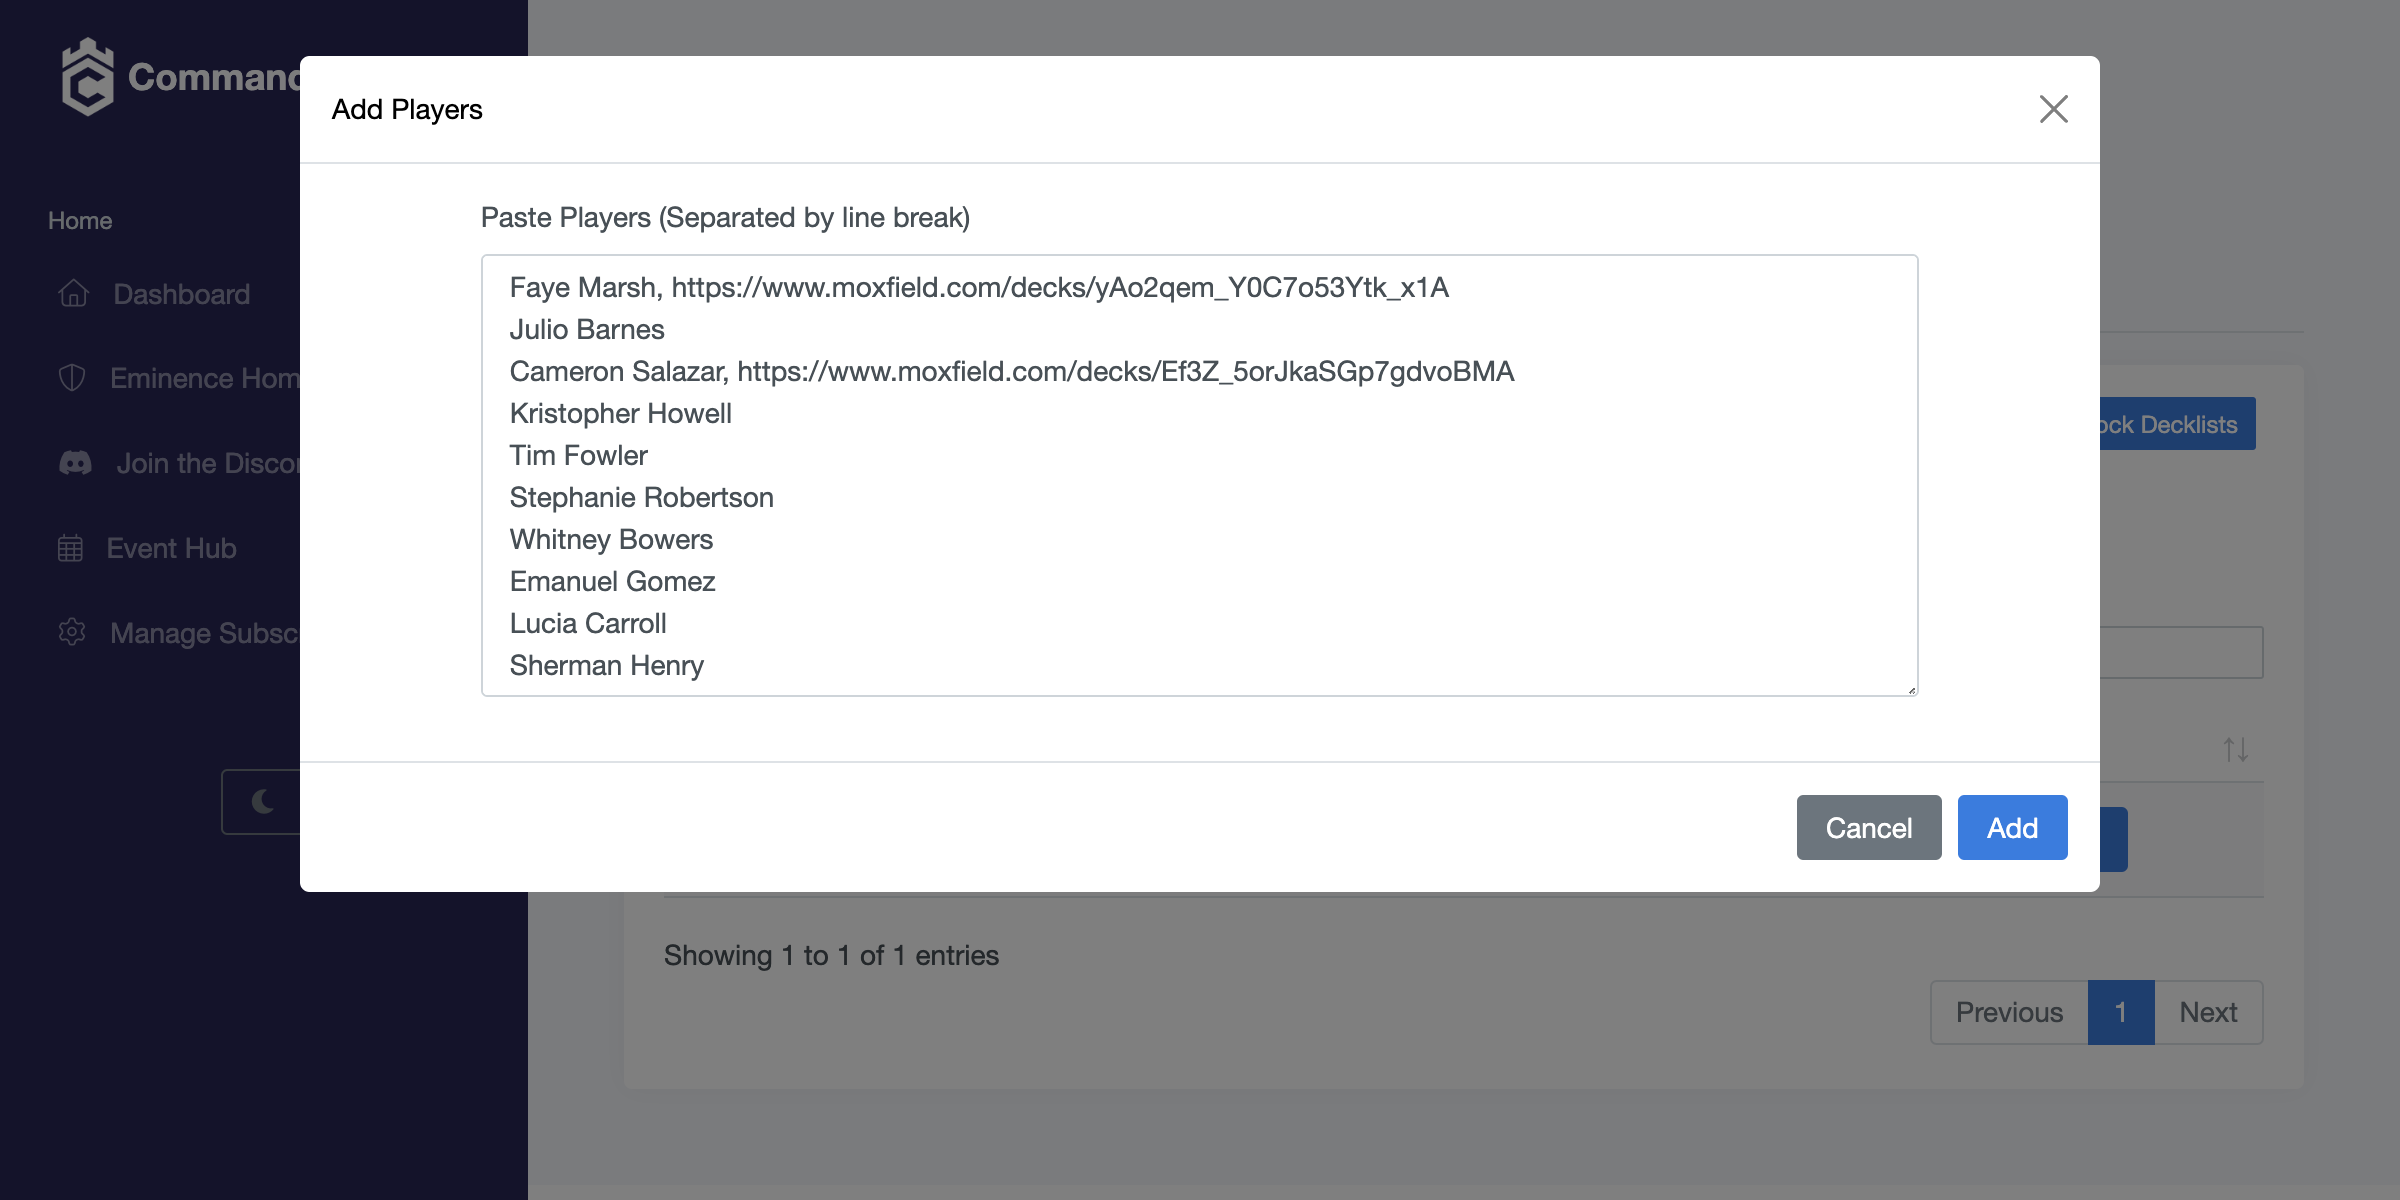
To add players manually, click on the "Add Players Manually" button in the player management menu. In the pop-up that appears, type in the names of the players, separated by a new line. You can also optionally include a comma after each name and paste a decklist link. These players will appear tagged with "Manual" in the player manager table.
Marking Players as Paid
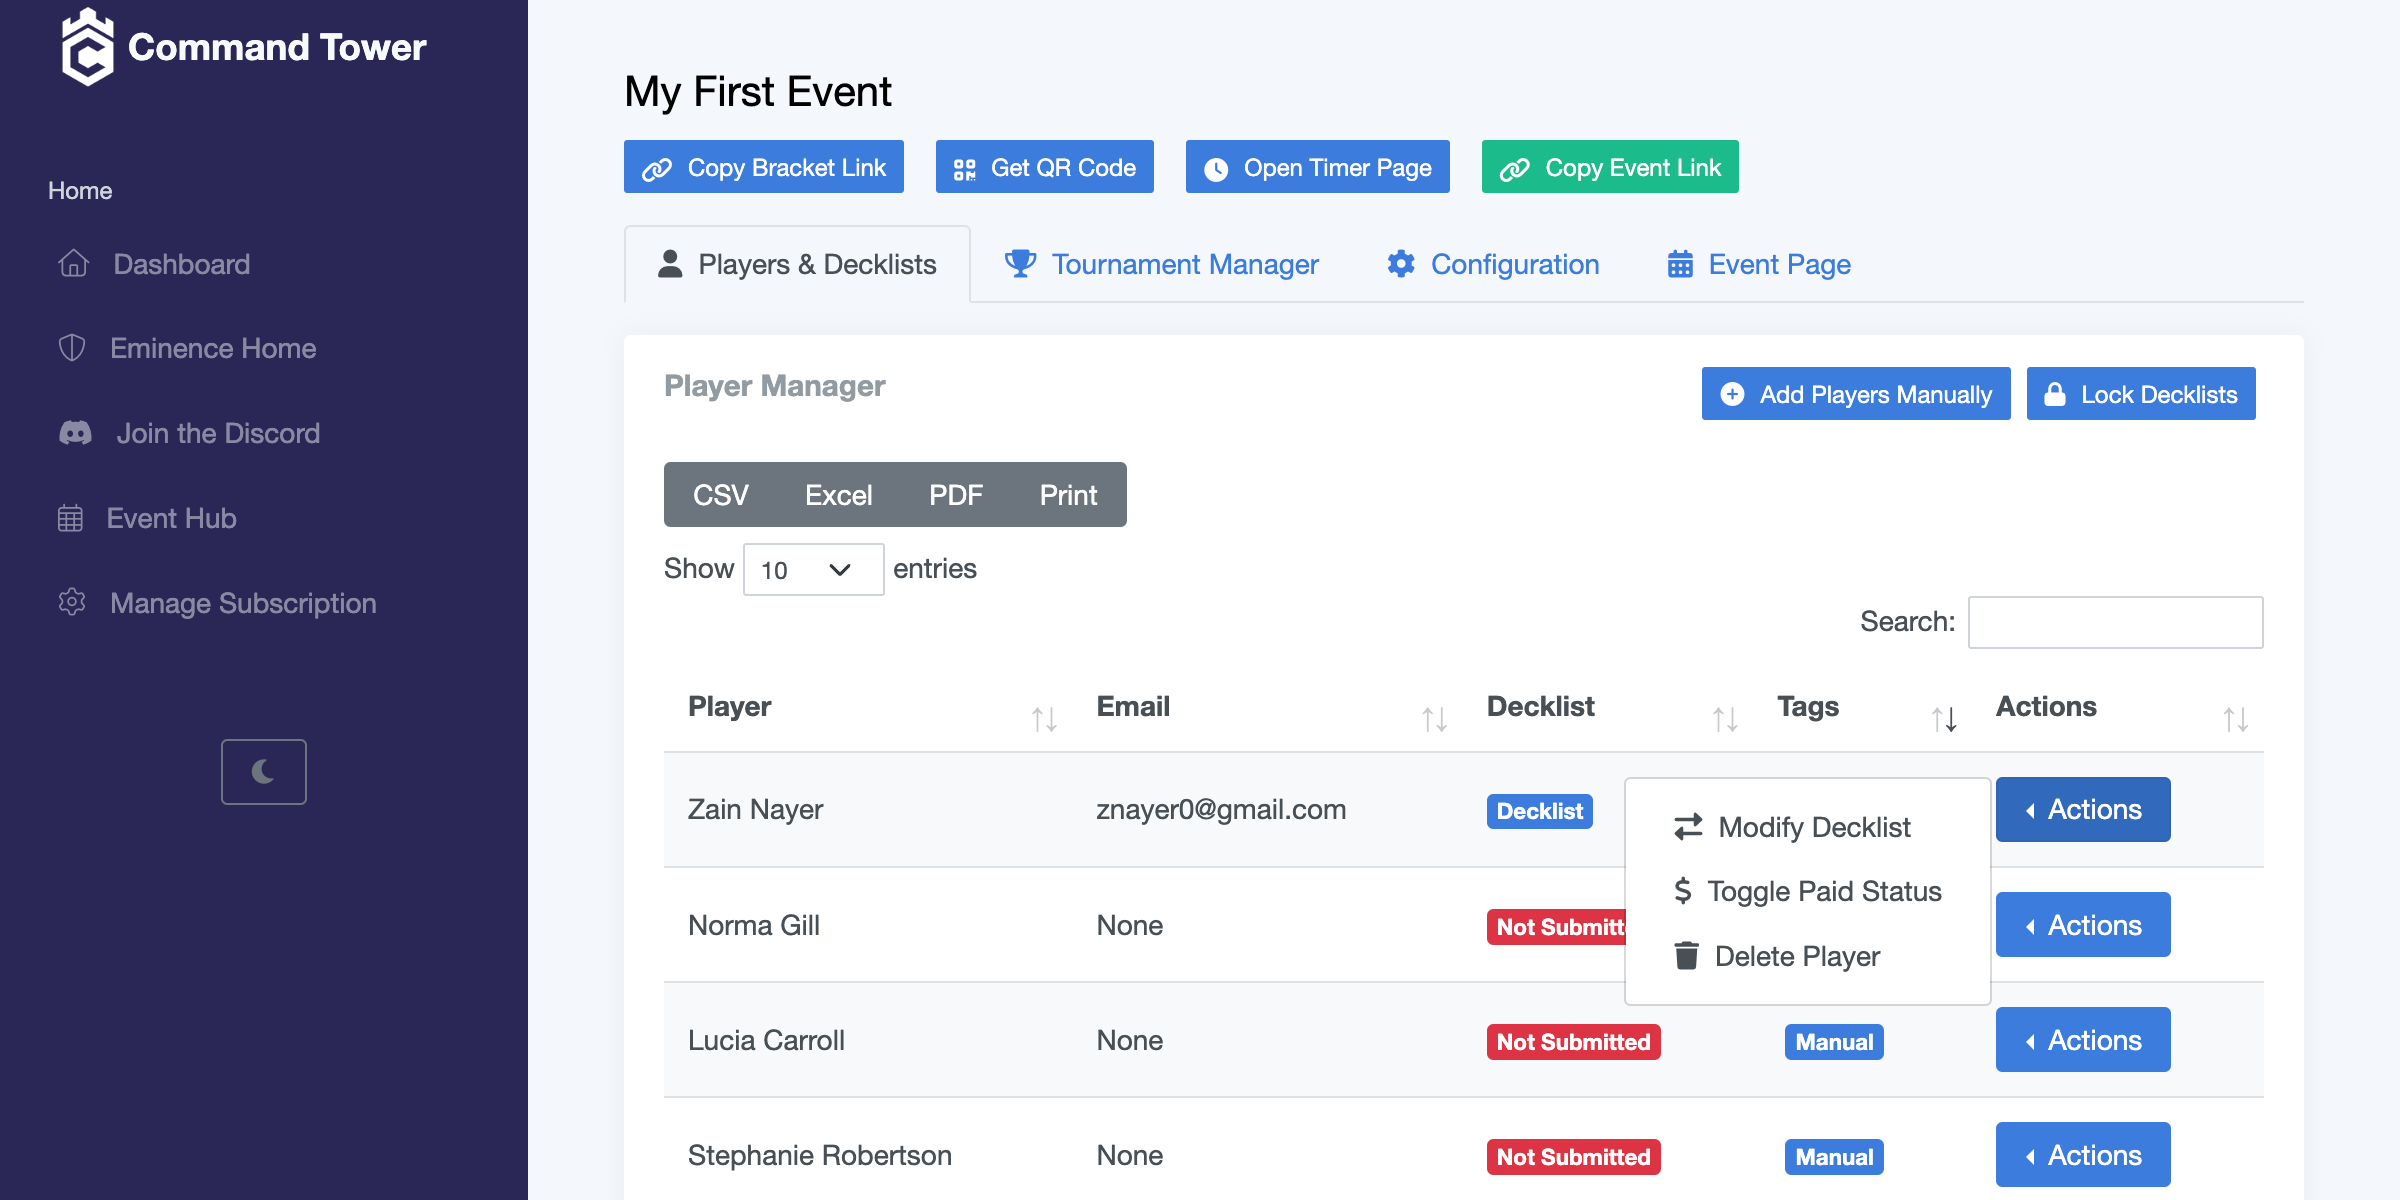
To mark a player as paid, simply click the "Toggle Paid Status" button in the action menu of the player. To remove the paid status, you can click the same button again.
Adding or Modifying Decklists
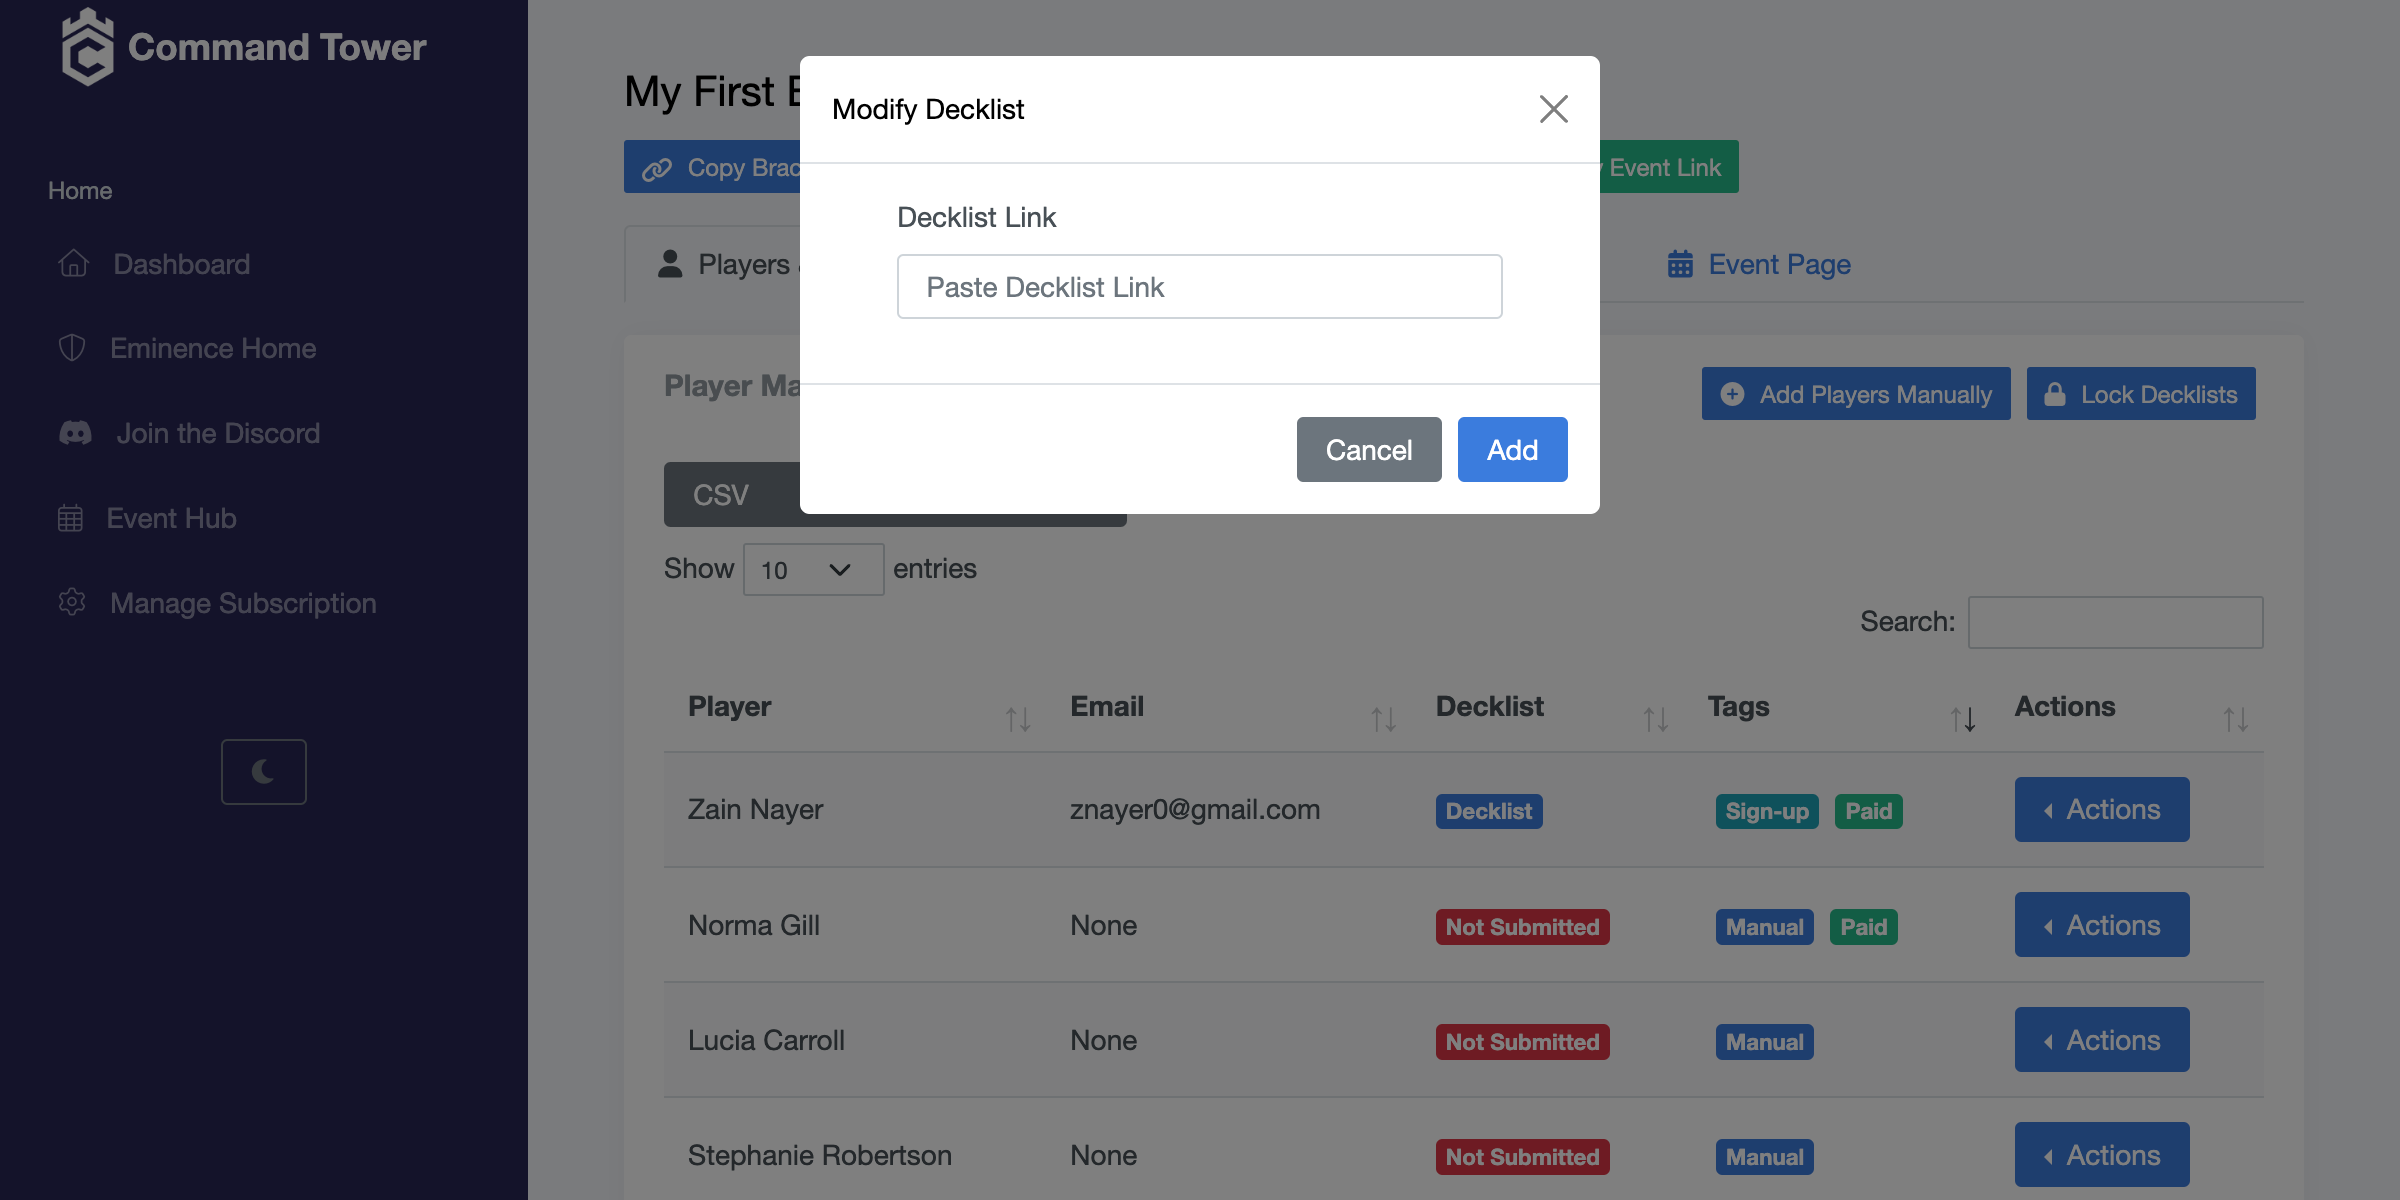
To add or modify a player's decklist, click on the "Modify Decklist" button in the action menu of the player. In the pop-up that appears, paste in the decklist link. This will update the player's decklist in the tournament.
Locking Decklists
Locking decklists is a great way to ensure that the decks used in the tournament are accurate and consistent. To lock decklists, click on the "Lock Decklists" button in the player management menu at the top. This process may take some time, so refrain from refreshing the page during this time.
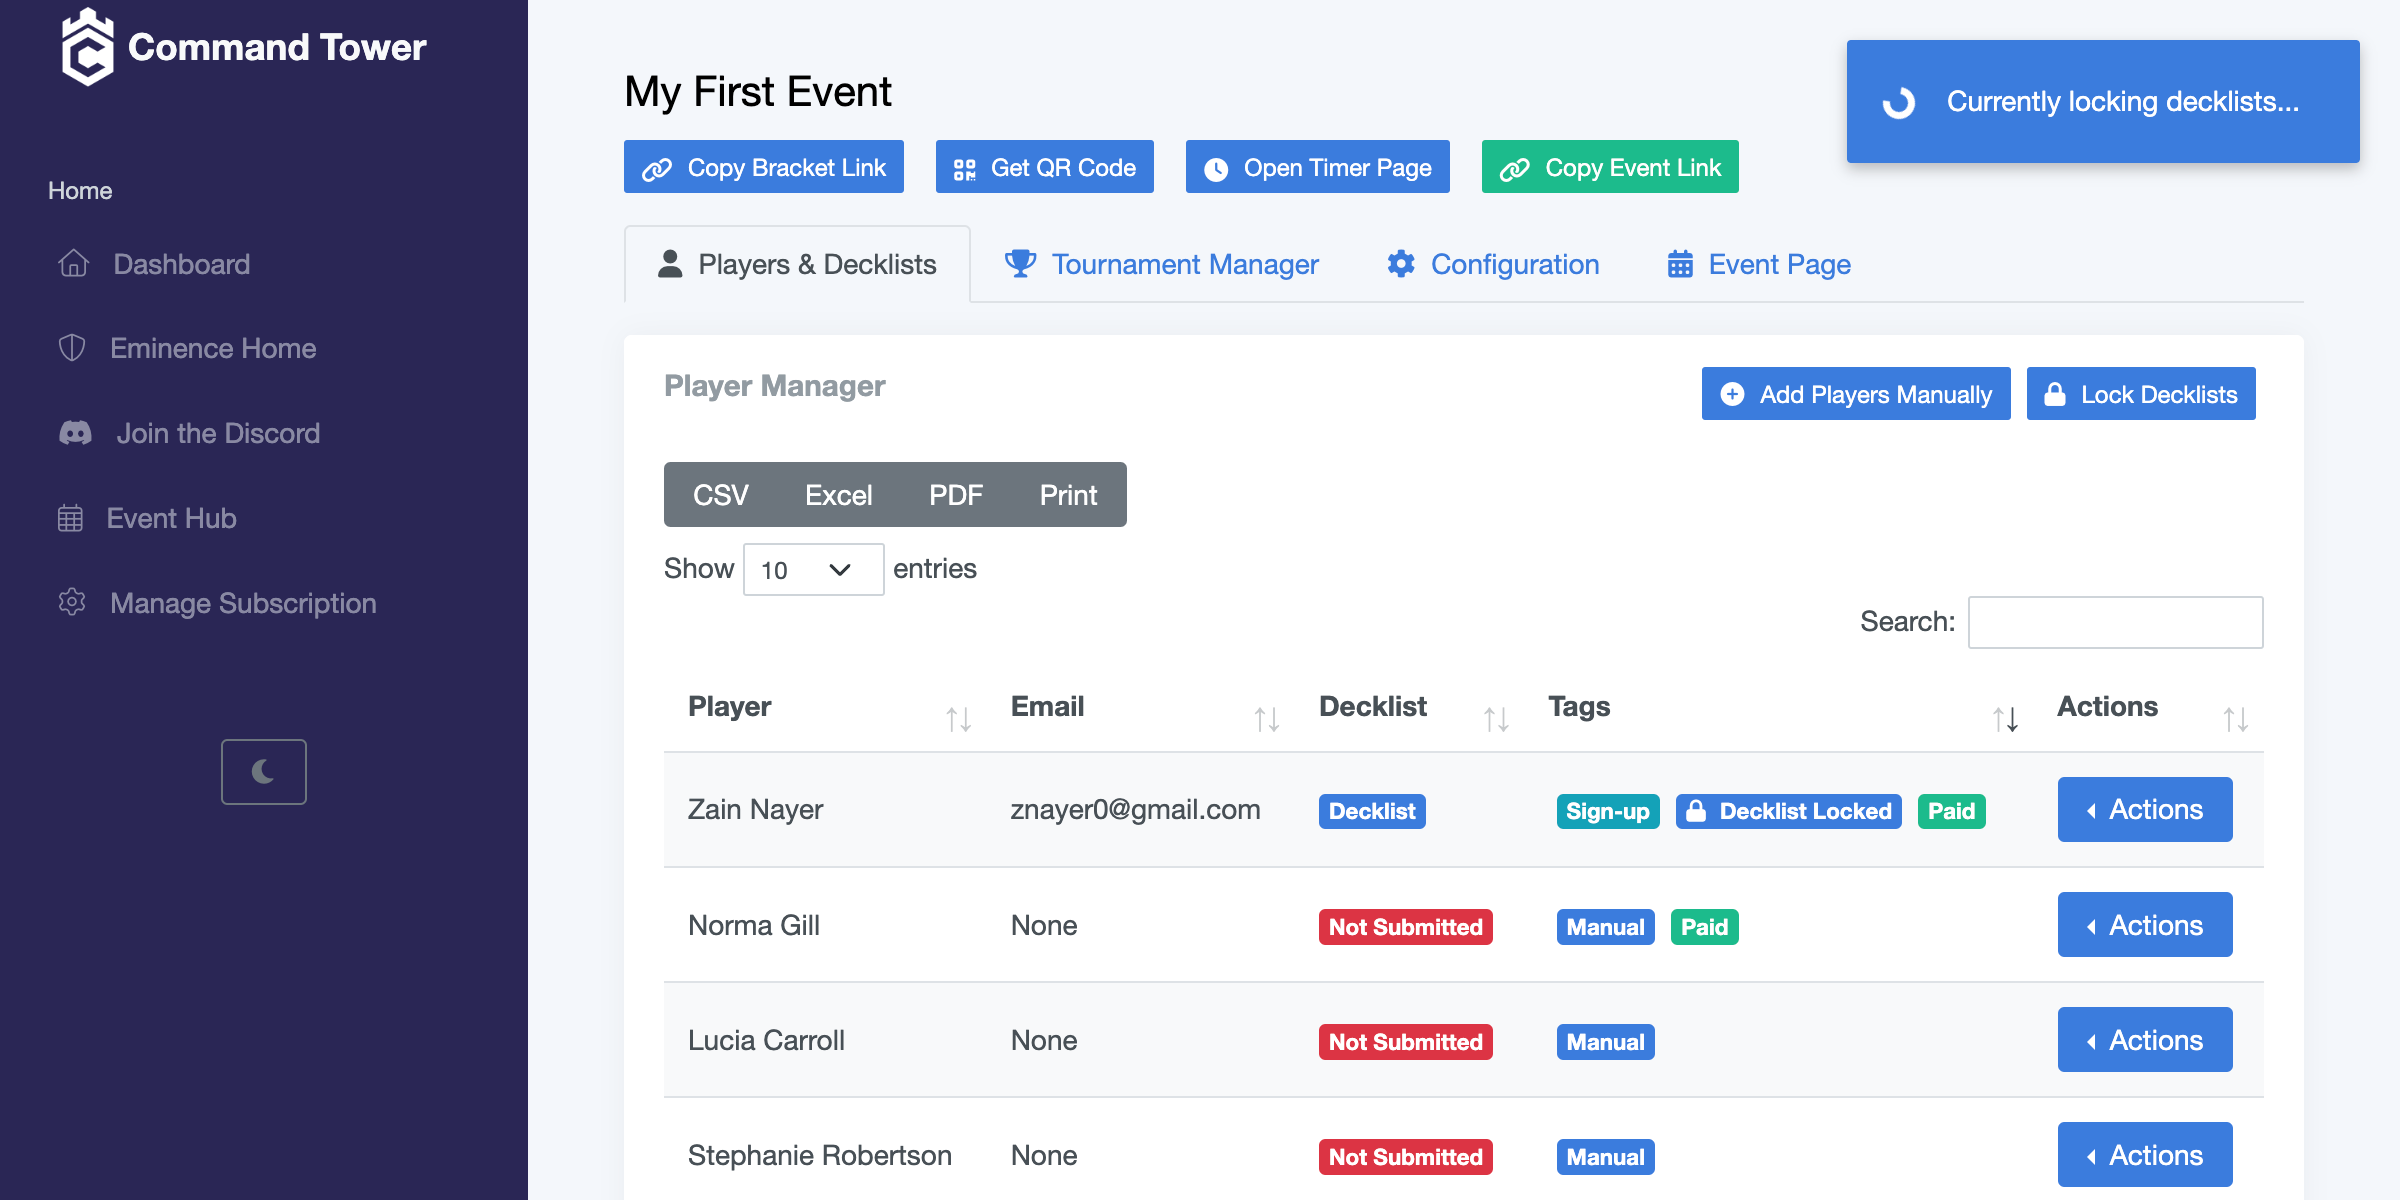
Once decklists are locked, players' decks will automatically update to reflect the locked list. Players with locked decklists are denoted with a "Decklist Locked" tag. Note that once a player's list has been locked, it cannot be re-locked.
If you have more players join later, you can press the button again to lock decks that haven't been locked yet. These locked lists are stored on Command Tower Moxfield and are frozen in time.
Deleting Players
To delete a player, click on the "Delete Player" button in the action menu of the player. Please note that if you delete a player, they cannot be recovered and must either register again or be manually added. Note that you cannot delete players after the tournament has started.
Managing players in Command Tower is easy and straightforward. By following the steps outlined in this article, you can quickly add, modify, and delete players, mark them as paid, and lock their decklists.
Running EDH tournaments
Command Tower is an easy-to-use platform for running your own EDH tournament. Here's how to get started:
Give Your Players the Bracket Link
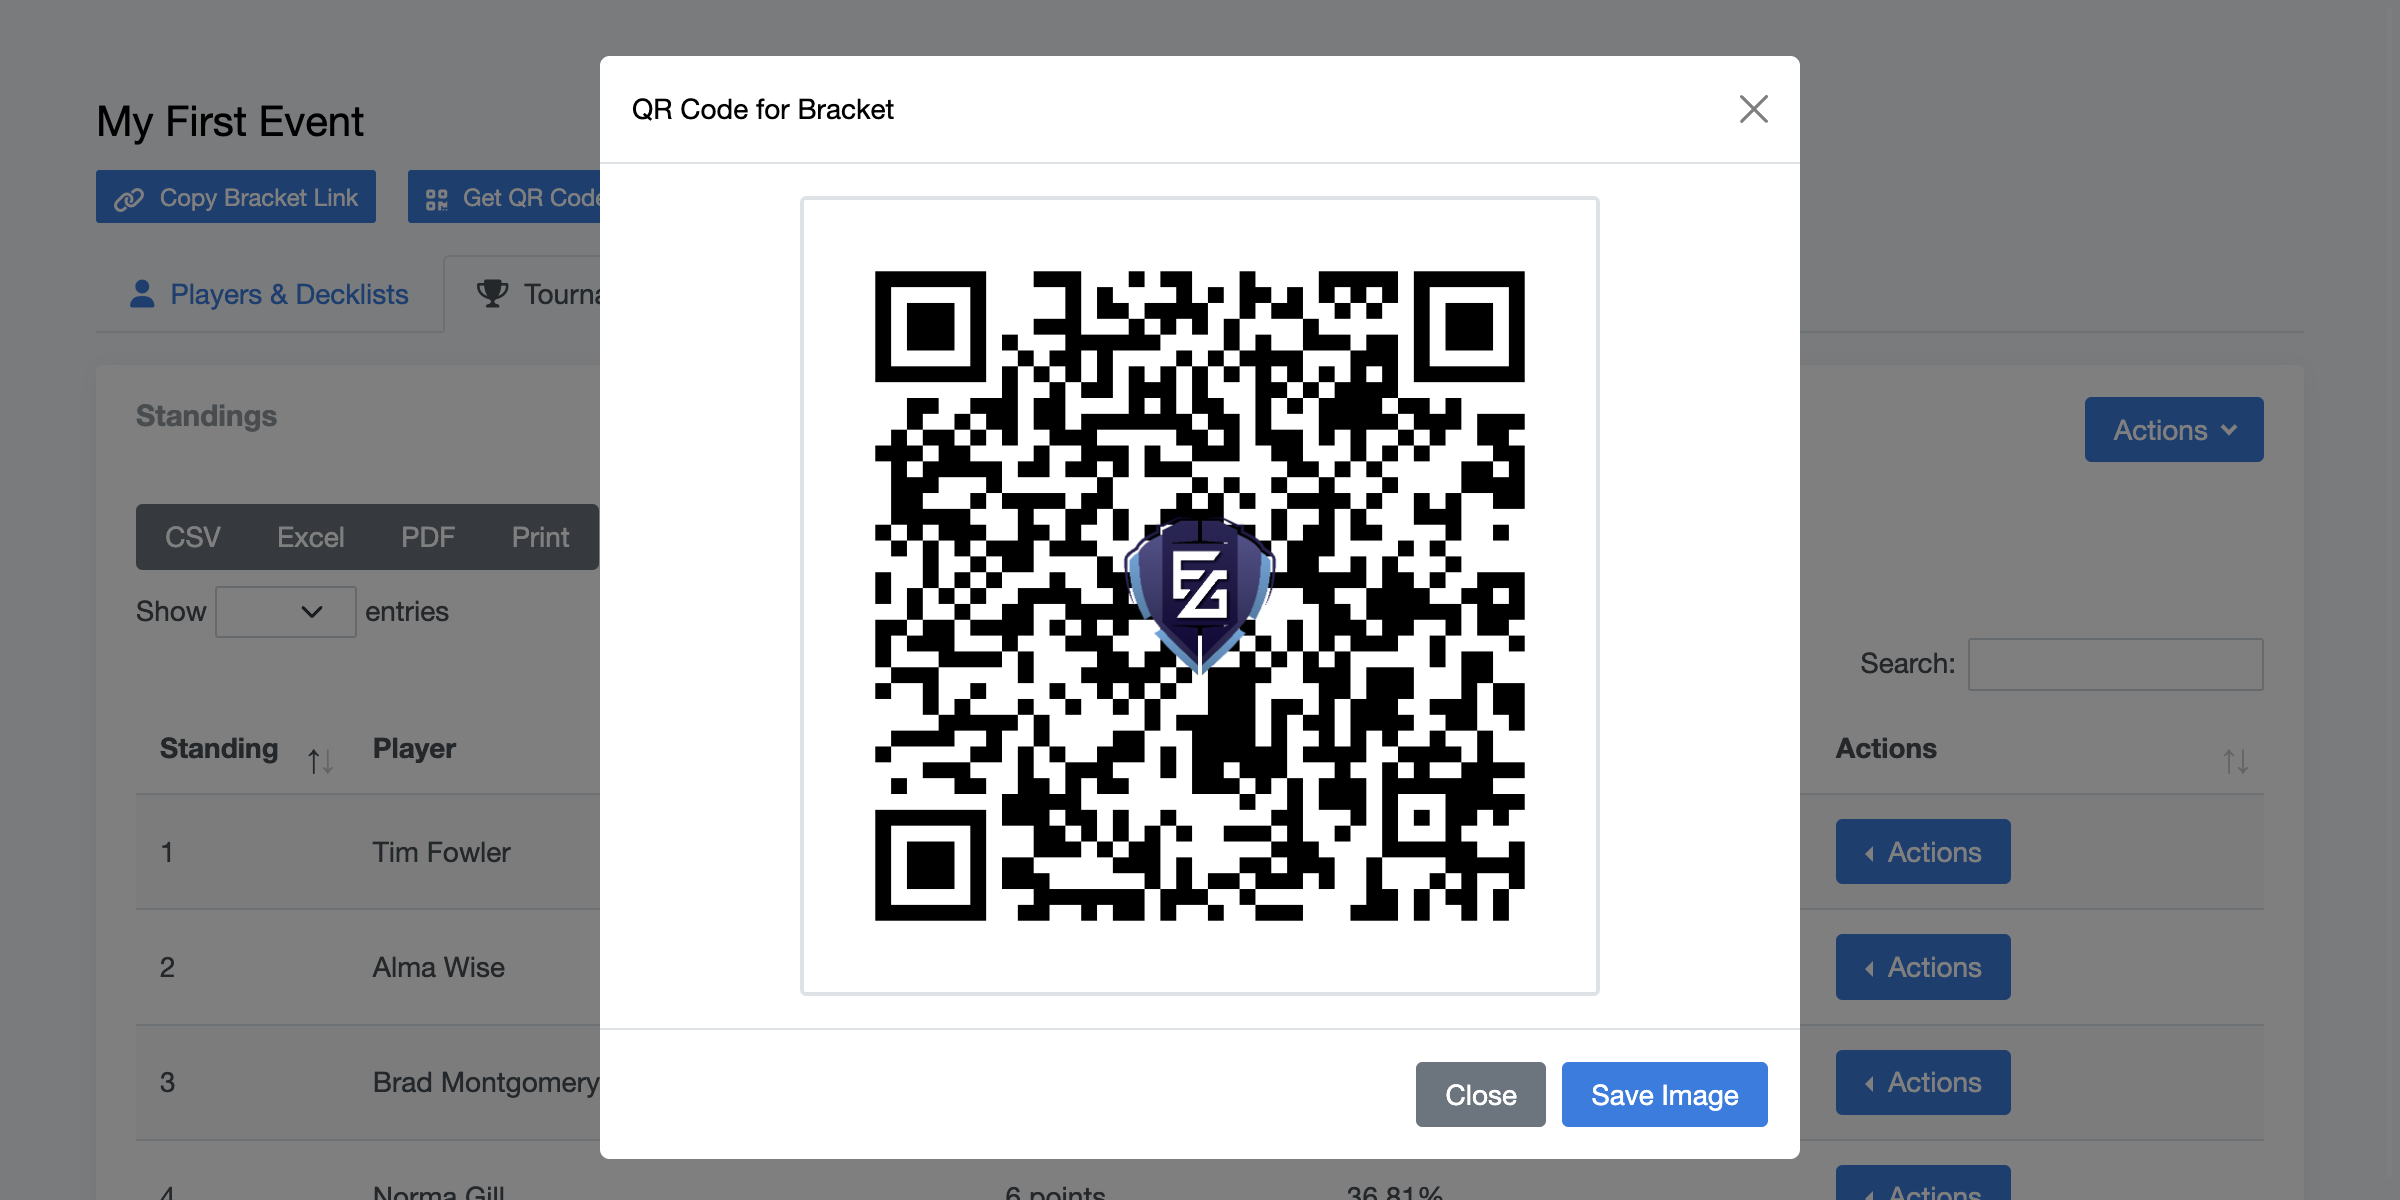
Make sure to give your players the bracket link. You can also get the QR code to the bracket link by clicking the "Get QR" button. The bracket link is where players can view standings and pods, all from their phone or web browser.
The Timer Page
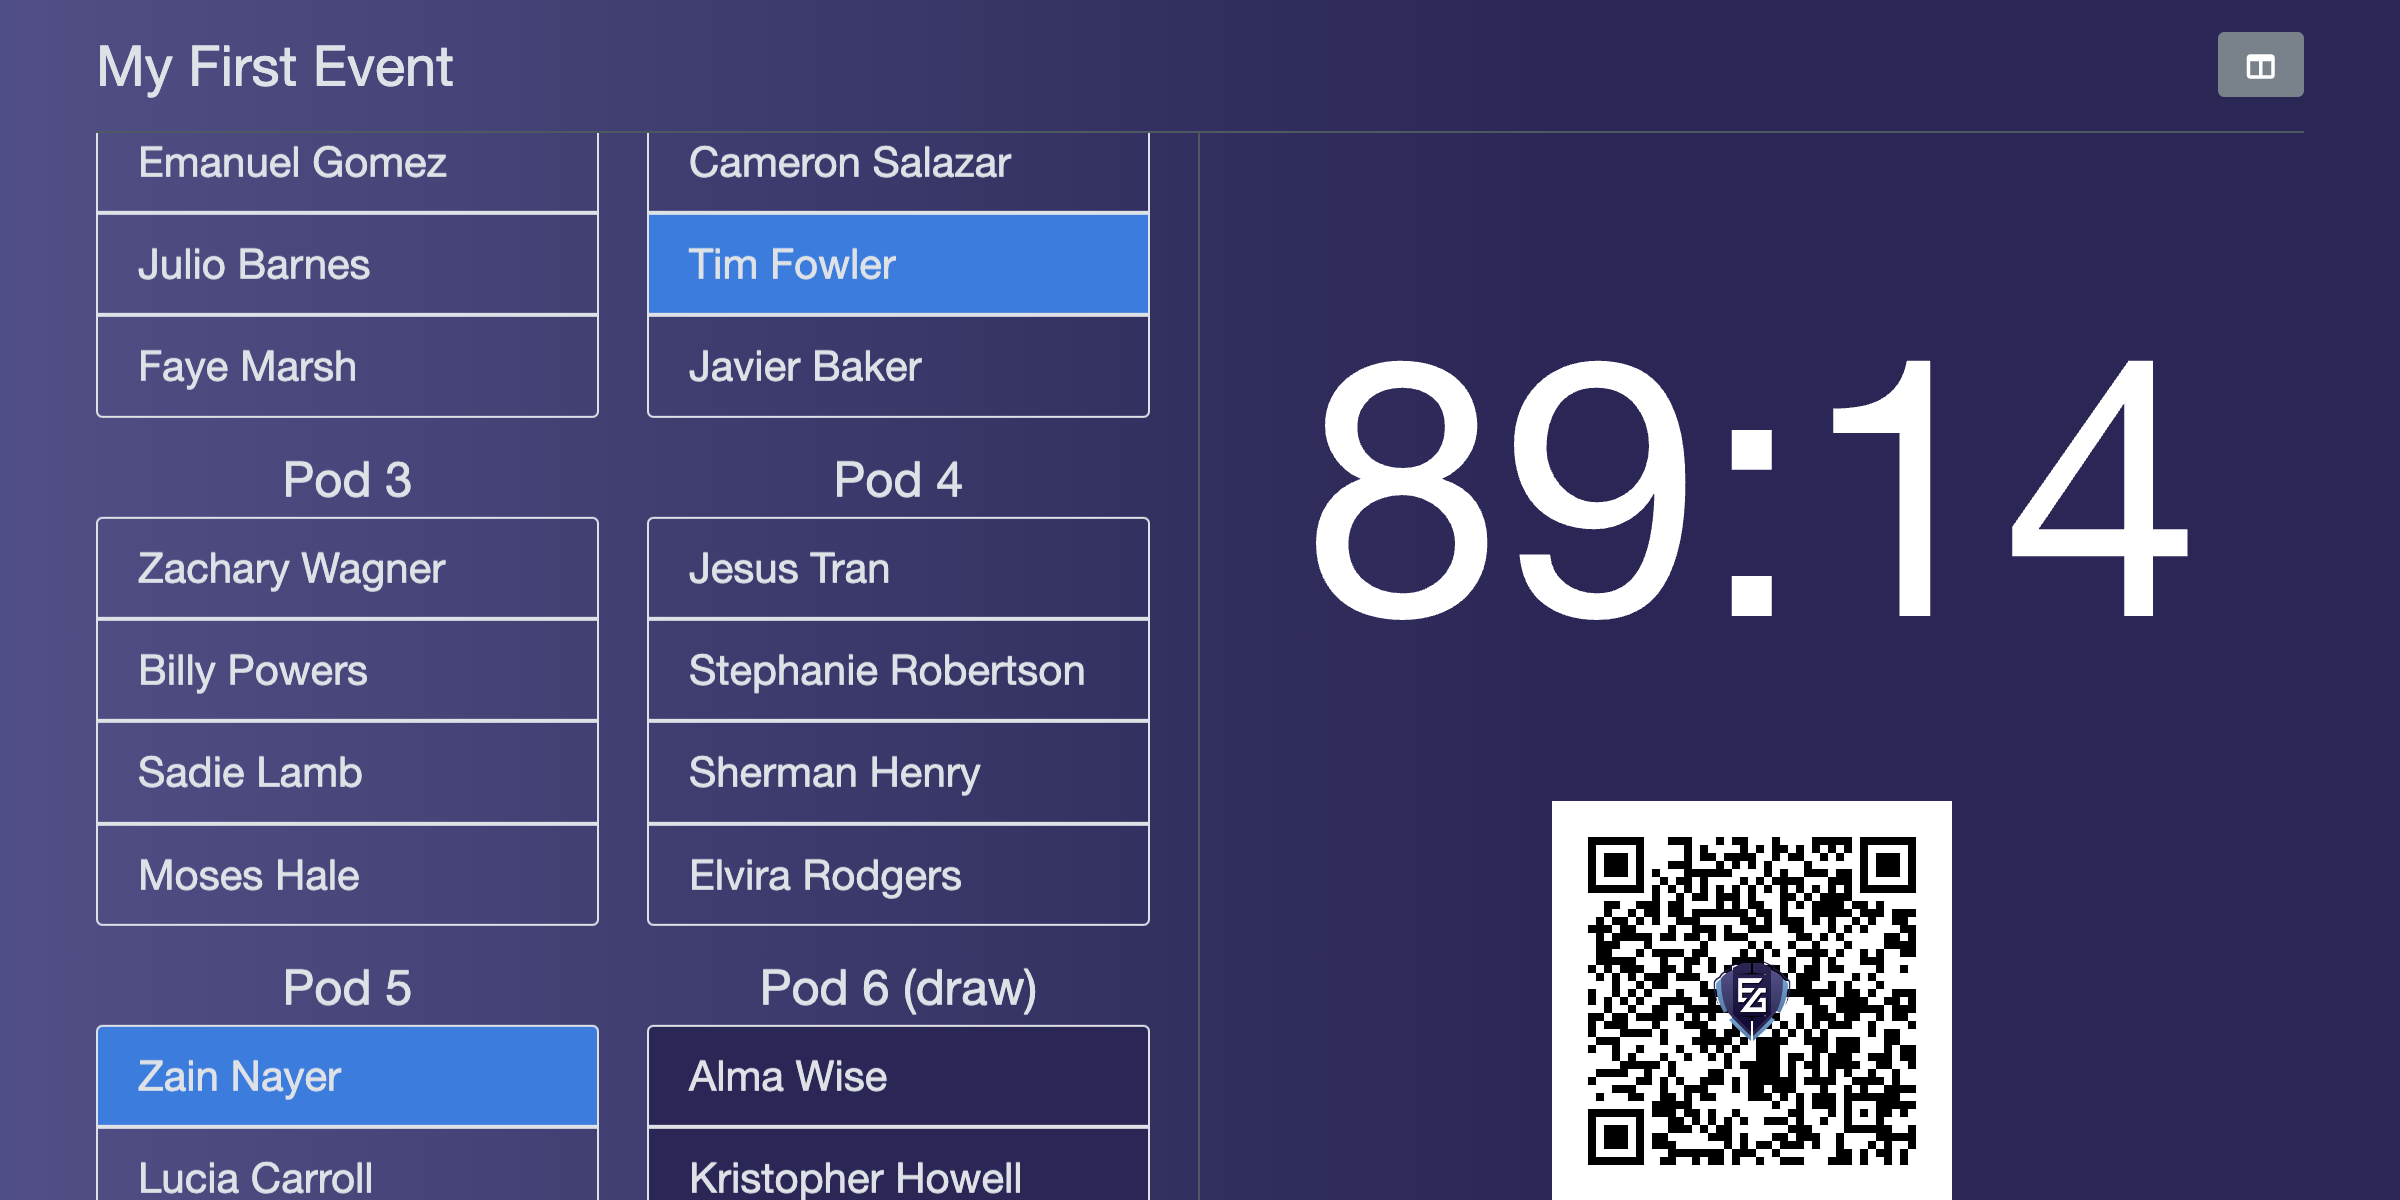
The Timer page displays the time remaining in the current round, as well as a scrolling view of the pods in the round. Tournament organizers can use this page to display the time and pods on a large screen or projector for players to easily see. The page also includes a QR code that links directly to the tournament bracket page.
To access the Timer Page, simply click the "Open Timer Page" button in the main menu. The pod view can be toggled on or off to show only the timer.
Using the Standings Card
The Standings Card is where you can manage your players during the tournament. From here, you can add players manually, load players from sign-up, lock decklists, clear all rounds in the tournament, drop players, assign game losses, assign round byes, lock players to a pod, modify decklists, and view decklists.

Adding Players Manually
To add players manually, click on the "Add Players Manually" button in the player management menu. In the modal that appears, type in the names of the players, separated by a new line. You can also optionally include a comma after each name and paste a decklist link.
Loading Players from Sign-Up
Although this is automatically done, you can reload players from sign-up by pressing the "Load via Sign-ups" button.
Locking Decklists
To lock decklists, click on the "Lock Decklists" button in the player management menu. This process may take some time, so refrain from refreshing the page during this time. Once decklists are locked, players' decks will automatically update to reflect the locked list. If you have more players join later, you can press the button again to lock decks that haven't been locked yet. These locked lists are stored on Command Tower Moxfield and are frozen in time.
Clearing All Rounds in the Tournament
You are able to clear all rounds in the tournament. This will reset the state of the tournament to "not started" and delete all rounds. This action is not reversible, so be careful. It is usually used when testing out the software and rounds, and the TO needs to clear the event before actually running it.
Dropping Players
To drop a player, open the action menu and press the drop button. Once dropped, a player can be undropped at any time. Dropped players are denoted by the red colored action button and always found on the last page. You can drop and undrop players between rounds. Dropping is not permanent and can be reversed at any time. You can drop players during a round with no negative effect.
Assigning Game Losses
You can assign a game loss to a player. This will make it so they don't play in the next round you create and gain no points.
Assigning Round Byes
You can also assign a round bye. This makes the player receive a bye in the next round you create, giving them a free win.

Locking Players to a Pod
You are able to lock players to a pod. This is great for players with special needs, as you can lock them to a specific table (pod). This will not affect the swiss whatsoever.
Modifying Decklists
You are able to modify decklists from the Standings Card menu. Do note that if you locked decklists, you will need to re-lock them if you modify them here.
Viewing Decklists
You are also able to view decklists, which will open the appropriate decklist link.
The Standings Table
The Standings Table shows relevant information, such as player standing, name, points earned, and opponent win percent.
Using the Pod Manager
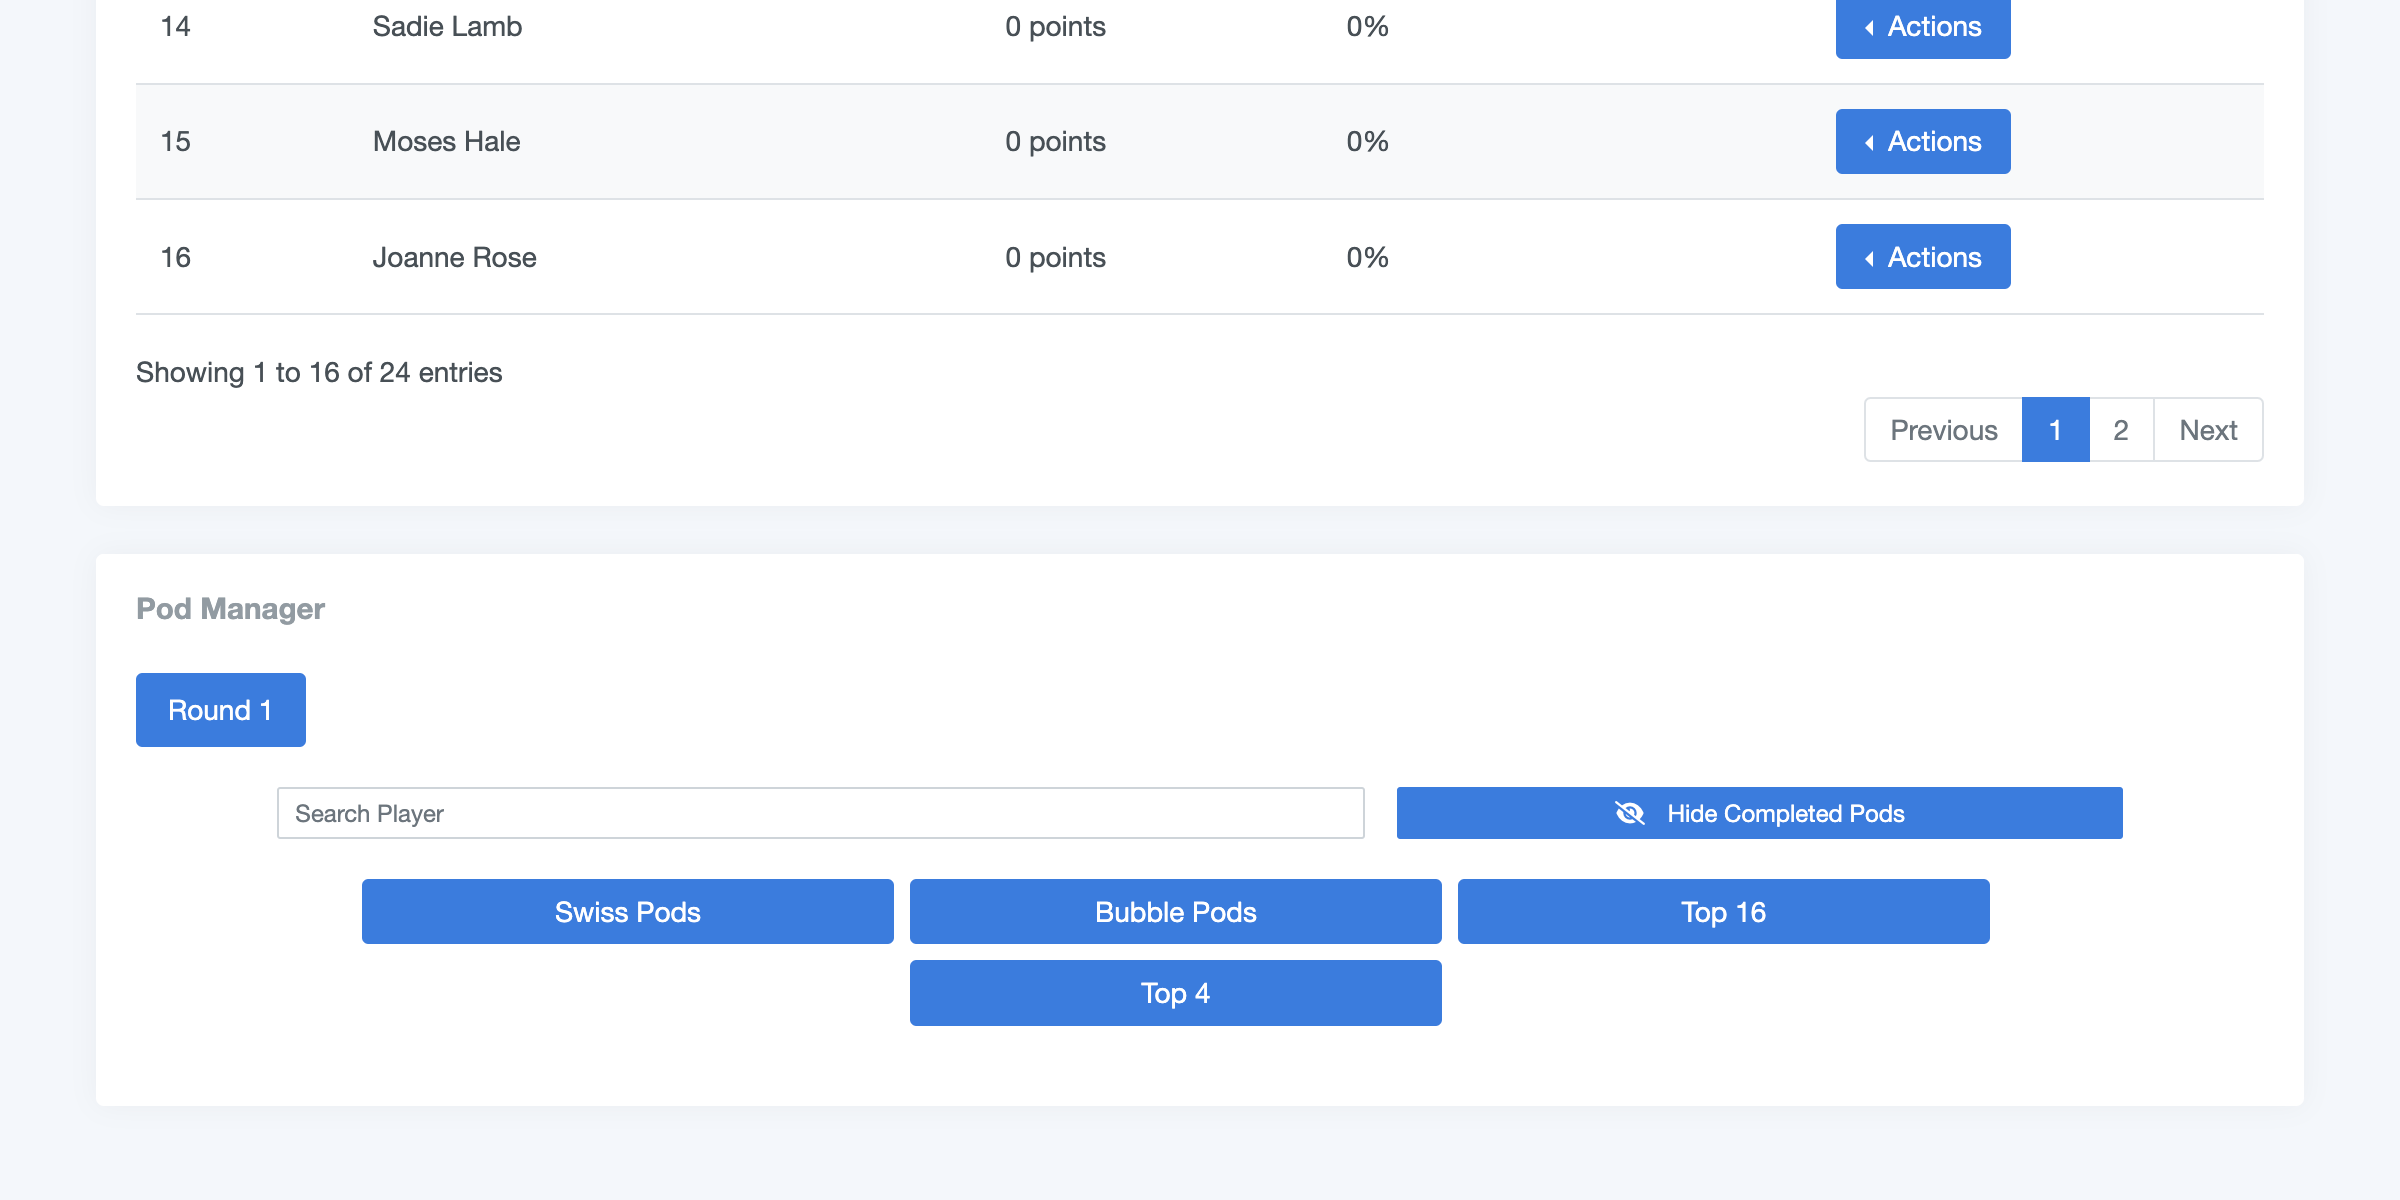
The Pod Manager is where you can create new rounds and manage each pod's results. The rounds are counted automatically, so there is no need to enter in how many rounds you want. Simply keep pressing the "New Round" button every time you want to start a new round.
Round Options
To start a new round, simply click the "New Round" button. From there, you have the following options:
- Swiss Pods: Create a new round with Swiss pairings. (Generally the only option you need)
- Bubble Pods: Create a new round pairing forcible top-down (may cause re-pairs, advisable if you want to force all the same points players to play against each other in the final swiss round)
- Top 16: Cut to the top 16 bracket for the tournament.
- Top 4: Cut to the top 4 bracket for the tournament.
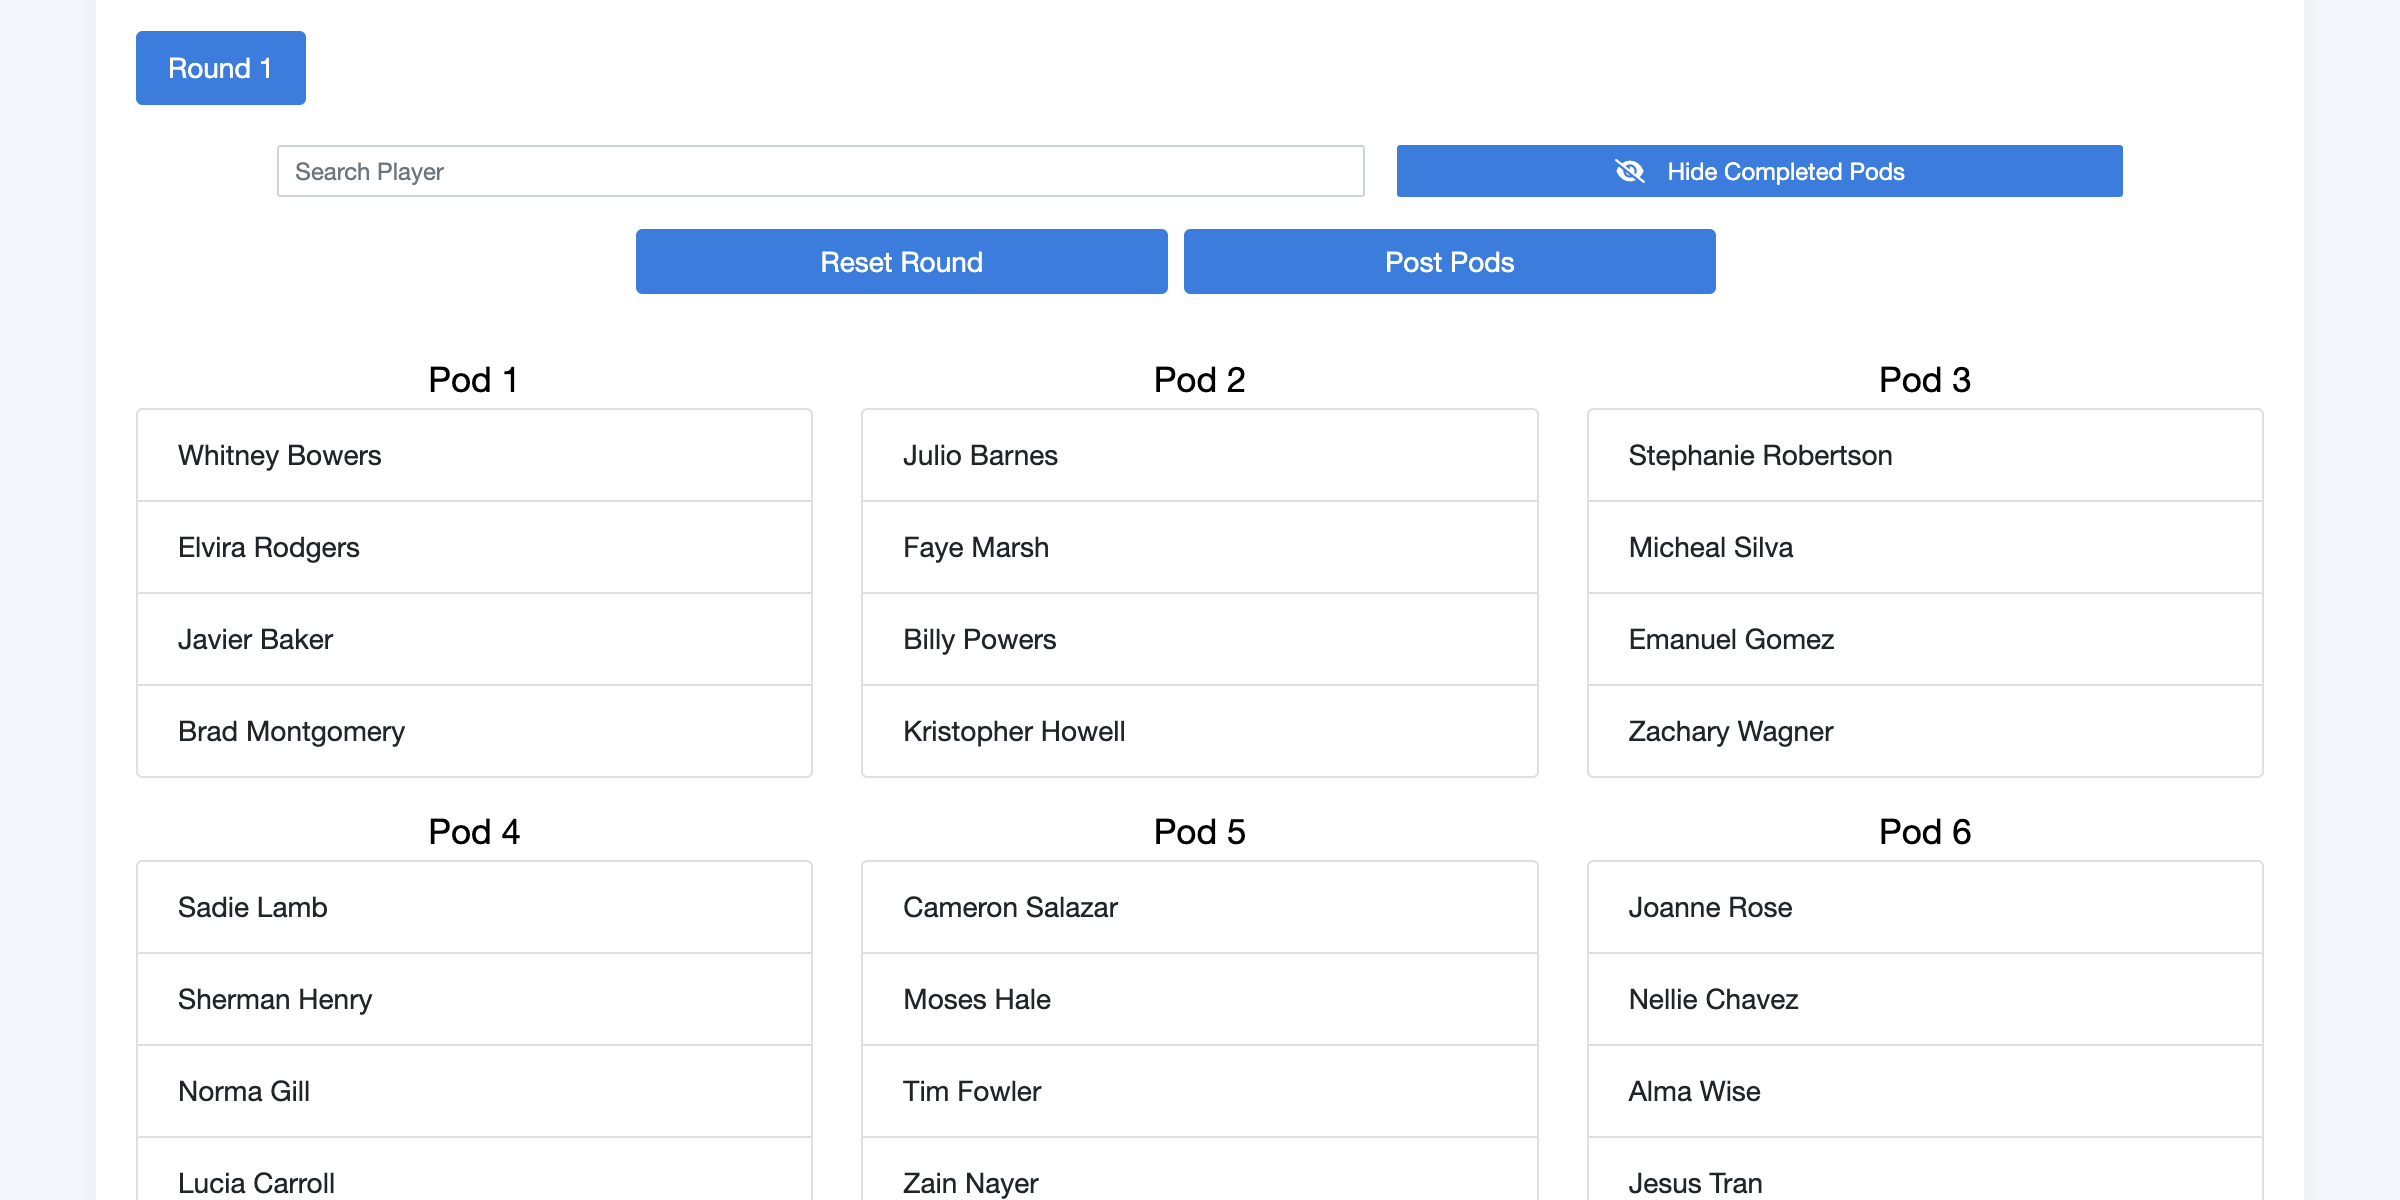
These options won't post the pods publicly just yet, just generate them on the TO end for you to look at. Once the round has been generated, feel free to look it over.
If you want to reset and recreate it, just press the "Reset Round" button and start over. If it looks good, press "Post Pods." This will make the pods public on the bracket page. If you find an issue with the posted pods, you are still able to reset it and recreate it.
Starting and Managing a Round
To start the round, press the "Start Round" button. This will start the timer. Once you start the round, you are no longer able to reset the round or go to the previous round to change results.
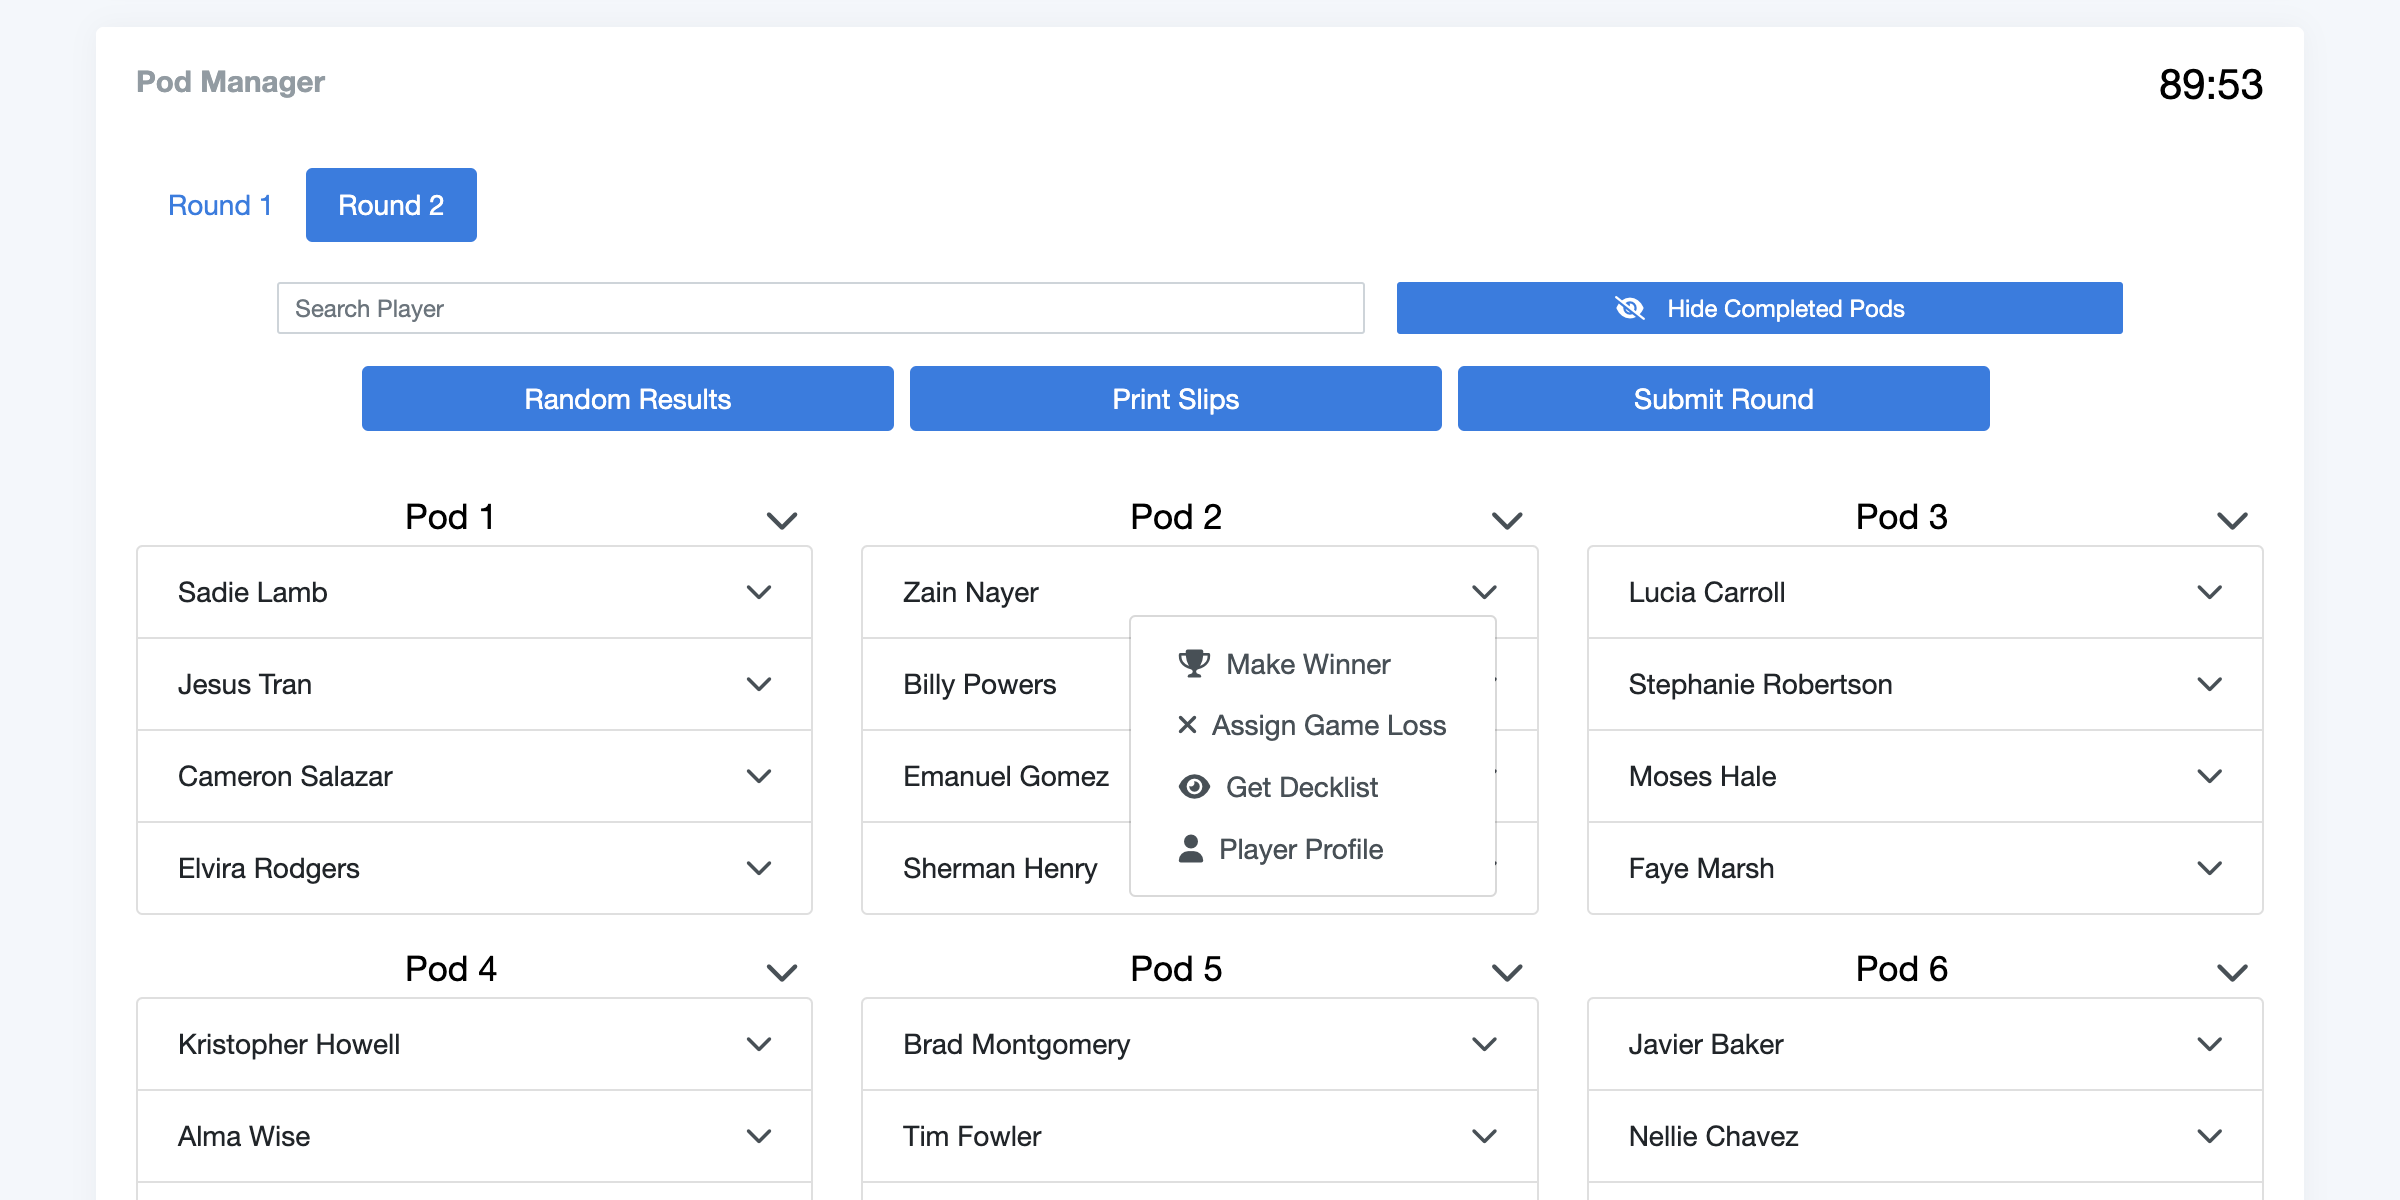
Once the round is started, dropdown menus will appear on each pod and next to each player name. Under the pod dropdown, you are able to mark a pod as a draw. Under each player, you will have a few options:
- You can mark the player as the winner.
- You can assign a game loss to the player. In the event of a draw, players with game losses (highlighted in red) will not receive the draw points. Some TOs use this to mark players who die in the game so they don't gain points in case the pod ends in a draw.
- If the player has a decklist submitted, you can view their decklist.
- If the player signed up with their Eminence account, you can view their player profile.
After assigning a pod a winner or marking it as a draw, you can change the result by clicking "Unlock Pod." After unlocking it, you can change the results.
You are able to search players by name using the search bar at the top. You can also hide or show completed pods to make parsing the list easier.
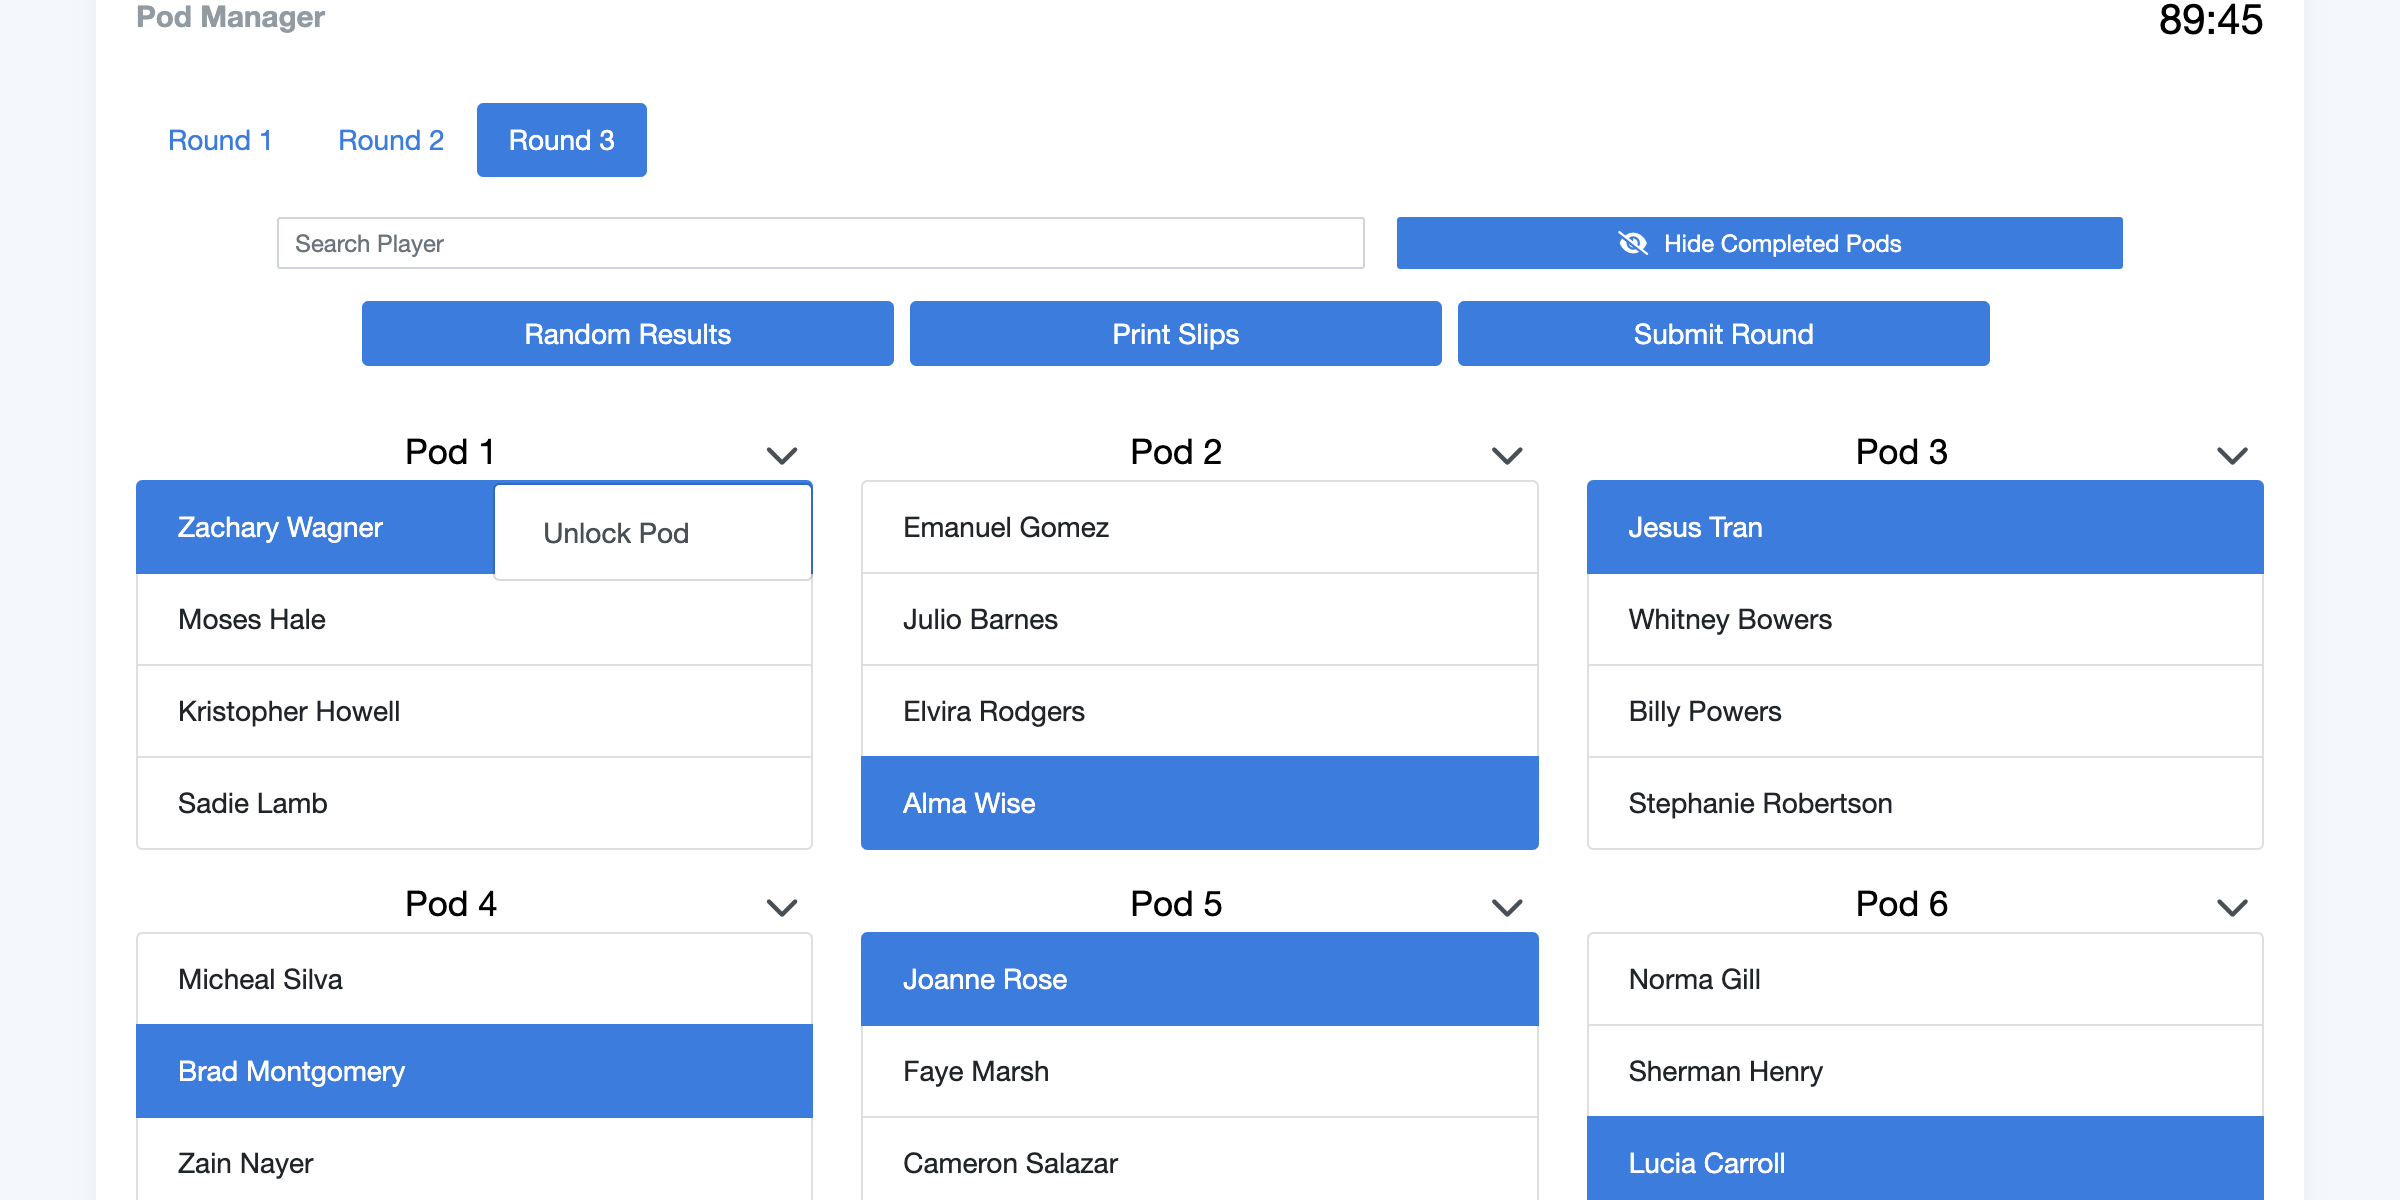
You are able to change the result of the previous round. If you have generated the next round, reset it. Then click the tab of the previous round at the top. From there, you can unlock pods and change results. Be aware that if you start the next round, you will not be able to do this.
Recommended Number of Rounds
The number of rounds you need for your EDH tournament depends on the number of players participating. Below is a list of recommended rounds based on the number of players:
| Number of Players | Recommended Number of Rounds |
|---|---|
| 16 players | 2 rounds single elimination |
| 17-32 players | 4 rounds, top 4 cut |
| 33-64 players | 5 rounds, top 16 cut |
| 65-128 players | 6 rounds, top 16 cut |
| 129-256 players | 7 rounds, top 16 cut |
| 257-512 players | 8 rounds, top 64 cut |
| 513-1024 players | 9 rounds, top 64 cut |
| 1025+ players | 10 rounds, top 64 cut |
It is important to note that these recommendations are just guidelines, and that the number of rounds needed may vary depending on the specific needs of your tournament. Additionally, the number of rounds may also be affected by factors such as time constraints, player availability, and tournament format.
Top Cut

Once ready, you can cut to the top 16 or top 4. Top 16 uses the above image to create pods by seeding. If cutting to top 16, after the round ends, it will automatically move into the finals (top 4).
Be sure to mark a winner of the final pod so the tournament can be marked as completed.
Running your own EDH tournament with Command Tower is straightforward and customizable. Follow the steps outlined in this article to create a 4 player Swiss pods tournament, add and manage players, create rounds and pods, and track results.